자바스크립트/모던 자바스크립트
자바스크립트 클래스 3 - 상속
Jake Seo
2023. 2. 1. 23:41
서브클래스
- ES5 에서 상속을 구현하는 방식은 꽤 복잡했다.
class문법이 생기면서 이러한 부분이 많이 개선되었다.
class ClassWithAlpha extends Color {}extends 를 이용하면, 두 개의 상속 체인이 생성된다. 해당 생성자로 생성된 객체에 대한 병렬상속관계라고 한다. 하나는 생성자 자체에 있으며, 하나는 생성자의 프로토타입 객체에 있다.
생성자 상속 체인
ColorWithAlpha서브클래스 생성자를 만든다.Color(슈퍼클래스 생성자 함수)Color의 프로토타입을 만들어 모든 정적 속성/메서드를ColorWithAlpha에서 접근 가능하게 한다.Function.prototype이외의 프로토타입을 갖는 함수의 개념이 등장한다.
프로토타입 체인
- 서브클래스 프로토타입 객체인
ColorWithAlpha.prototype을 만든다.Color.prototype을 객체의 프로토타입으로 만들어ColorWithAlpha로 만든 객체가 슈퍼클래스 속성과 메서드를 상속하도록 한다.
- 생성자 상속 체인은 ES2015 의 새로운 기능이다.
두 개의 체인 살펴보기
ColorWithAlpha->Color->Function.prototype->Object.prototypeColorWithAlpha.prototype->Color.prototype->Object.prototype
const colorWithAlpha = new ColorWithAlpha(10, 10, 10, 1);
console.log(Object.getPrototypeOf(ColorWithAlpha) === Color); // true
console.log(
  Object.getPrototypeOf(ColorWithAlpha.prototype) === Color.prototype
); // true
로그를 찍어봄으로써, 위의 두개의 체인을 직접 확인할 수 있다.
Object.getPrototypeOf()가 반환하는 것은 해당 객체가 상속하는 객체이다.Object.prototype이 반환하는 것은 해당 객체를 하위 객체가 상속했을 때, 하위 객체에게 물려줄 프로토타입 체인이다.비슷해보이지만, 차이가 있다.
super 키워드
super: 서브클래스 생성자에서 상위 클래스의 생성자를 호출하거나 상위 클래스의 속성 및 메서드를 참조하는데 사용할 수 있다.- 그 자체로는 못쓰고 오직 생성자 함수 호출이나 슈퍼클래스의 필드를 뒤지는 데만 사용할 수 있다.
console.log(super)와 같은 코드는 문법 에러이다.
- 슈퍼 클래스가 있는 경우, 생성자에서
this를 사용할 때는 반드시super키워드 이후에 나와야 한다.super를 통해 상위 객체를 먼저 만들어주어야 한다.Uncaught ReferenceError: Must call super constructor in derived class before accessing 'this' or returning from derived constructor
- 그 자체로는 못쓰고 오직 생성자 함수 호출이나 슈퍼클래스의 필드를 뒤지는 데만 사용할 수 있다.
서브 클래스의 기본(자동 생성) 생성자
명시적 생성자가 없더라도, 슈퍼 클래스의 생성자를 기본적으로 호출한다. 많은 경우에 서브 클래스에 직접 생성자를 작성할 필요가 없다.
// 서브 클래스에 자동 생성된 생성자
constructor(/* 인수들 */) {
  super(/* 전달 */)
}
ES5 에서는 아래와 같은 과정을 거쳐야 했다.
var ColorWithAlpha = function ColorWithAlpha() {
  Color.apply(this, arguments);
};

ColorWithAlpha.prototype = Object.create(Color.prototype);
ColorWithAlpha.prototype.constructor = ColorWithAlpha;ColorWithAlpha에서Color의 정적 속성과 메서드를 사용할 수 없었다.- 실수하기 쉬운 코드이다.
서브 클래스의 커스텀 생성자
class Color {
  constructor(r = 0, g = 0, b = 0) {
    this.r = r;
    this.g = g;
    this.b = b;
  }

  toString() {
    return this.rgb;
  }
}

class ColorWithAlpha extends Color {
  constructor(r = 0, g = 0, b = 0, a = 1) {
    super(r, g, b);
    this.a = a; // super() 뒤에 와야 에러가 나지 않는다.
  }
}super()를 통해 상위클래스의 생성자를 먼저 호출해야this를 사용할 수 있다.- 엔진마다 다른 에러가 난다.
- ReferenceError: Must call super constructor in derived class before accessing 'this' or returning from derived constructor
- ReferenceError: Must call super constructor before using |this| in
ColorWithAlphaclass constructor - ReferenceError: this is not defined
- 당연히
super()를 두번 호출해도 에러가 난다.
ES5 에서는 아래와 같이 작성할 수 있었다.
var ColorWithAlpha = function ColorWithAlpha(r, g, b, a) {
  // function 을 이용할 땐 `super()` 로 상위 객체를 먼저 생성하지 않아도 에러가 나지 않는다.
  // 프로토타입 체이닝을 이용해 상속을 흉내낸 것이기 때문이다.
  this.a = a;
  Color.call(this, r, g, b);
};
서브 클래스의 슈퍼 클래스 메서드 접근
ES 2015
class Color {
  // ...

  brightness() {
    return Math.sqrt(
      (this.r * this.r * 0.299) +
      (this.g * this.g * 0.587) +
      (this.b * this.b * 0.114) +
    )
  }
}
먼저, 슈퍼 클래스의 내용은 위와 같다.
사람의 눈이 빨, 녹, 파의 밝기를 다르게 인식하여 상수가 각각 다르다.
class ColorWithAlpha extends Color {
  // ...

  brightness(bgColor) {
    let result = super.brightness() * this.a;

    if (bgColor && this.a !== 1) {
      result = (result + bgColor.brightness() * (1 - this.a)) / 2;
    }

    return result;
  }
}- 밝기 정의는 불투명도를 고려해야 하는
ColorWithAlpha에서는 조금 다르게 동작해야 한다. Color클래스의brightness()를 이용하여,ColorWithAlpha의brightness()메서드를 구현했다.
ES5
ColorWithAlpha.prototype.brightness = function brightness(bgColor) {
  var result = Color.prototype.brightness.call(this) * this.a;
  if (bgColor && this.a !== 1) {
    result = (result + bgColor.brightness() * (1 - this.a)) / 2;
  }

  return result;
};super로 간단하게 표현할 수 있는 부분을 길게 적었어야 했다.
var superproto = Object.getPrototypeOf(ColorWithAlpha.prototype);
var result = superproto.brightness.call(this) * this.a;- 위와 같이
Object.getPrototypeOf()를 이용하여 참조해도 된다.
정적 메서드 상속
class Color {
  constructor(r = 0, g = 0, b = 0) {
    this.r = r;
    this.g = g;
    this.b = b;
  }

  get rgb() {
    return `rgb(${this.r}, ${this.g}, ${this.b})`;
  }

  set rgb(value) {
    let s = String(value);
    let match = /^rgb\((\d{1, 3}),(\d{1, 3}), (\d{1,3})\)$/i.exec(
      s.replace(/\s/g, "")
    );

    if (!match) {
      throw new Error(`Invalid rgb color string '${s}'`);
    }
  }

  toString() {
    return this.rgb;
  }

  halfBright() {
    const ctor = this.constructor || Color;
    return new ctor(
      Math.round(this.r / 2),
      Math.round(this.g / 2),
      Math.round(this.b / 2)
    );
  }

  static fromCSS(css) {
    const match = /^#?([0-9a-f]{3}|[0-9a-f]{6});?$/i.exec(css);

    if (!match) {
      throw new Error("invalid CSS code: " + css);
    }

    let vals = match[1];
    if (vals.length === 3) {
      vals = vals[0] + vals[0] + vals[1] + vals[1] + vals[2] + vals[2];
    }

    return new this(
      parseInt(vals.substring(0, 2), 16),
      parseInt(vals.substring(2, 4), 16),
      parseInt(vals.substring(4, 6), 16)
    );
  }
}

class ColorWithAlpha extends Color {
  constructor(r = 0, g = 0, b = 0, a = 1) {
    super(r, g, b);
    this.a = a; // super() 뒤에 와야 에러가 나지 않는다.
  }

  get rgba() {
    return `rgb(${this.r}, ${this.g}, ${this.b}, ${this.a})`;
  }

  toString() {
    return this.rgba;
  }

  brightness(bgColor) {
    let result = super.brightness() * this.a;

    if (bgColor && this.a !== 1) {
      result = (result + bgColor.brightness() * (1 - this.a)) / 2;
    }

    return result;
  }

  static fromCSS(css, a = 1) {
    const result = super.fromCSS(css);
    result.a = a;
    return result;
  }
}

const ca = ColorWithAlpha.fromCSS("#1E90FF", 0.5);
console.log(String(ca)); // "rgba(30, 144, 255, 0.5)"
console.log(ca.constructor.name); // "ColorWithAlpha"
console.log(ca instanceof ColorWithAlpha); // true- 여기서 사용된
fromCSS()는Color클래스의 정적메서드인데 어떻게ColorWithAlpha클래스를 생성했을까?- 이전에 배웠던, 생성자 상속 체인 덕에 가능하다.
ColorWithAlpha->Color->Function.prototype->Object.prototypeColorWithAlpha.prototype->Color.prototype->Object.prototype
class Color {
  // ...

  static fromCSS(css) {
    const match = /^#?([0-9a-f]{3}|[0-9a-f]{6});?$/i.exec(css);

    if (!match) {
      throw new Error("invalid CSS code: " + css);
    }

    let vals = match[1];
    if (vals.length === 3) {
      vals = vals[0] + vals[0] + vals[1] + vals[1] + vals[2] + vals[2];
    }

    return new this(
      parseInt(vals.substring(0, 2), 16),
      parseInt(vals.substring(2, 4), 16),
      parseInt(vals.substring(4, 6), 16)
    );
  }
}
new Color가 아닌new this()를 이용했기 때문에ColorWithAlpha에서 호출한 경우, 새ColorWithAlpha를 반환한다.ColorWithAlpha에서의this는ColorWithAlpha이다.
새 인스턴스를 반환하는 메서드
Array.prototype의slice,map과 같은 메서드는 새 인스턴스를 생성한다.- 이전의
fromCSS도new this()를 통해 새로운 인스턴스를 생성했다.
class Color {
  constructor(r = 0, g = 0, b = 0) {
    this.r = r;
    this.g = g;
    this.b = b;
  }

  static fromCSS(css) {
    const match = /^#?([0-9a-f]{3}|[0-9a-f]{6});?$/i.exec(css);

    if (!match) {
      throw new Error("invalid CSS code: " + css);
    }

    let vals = match[1];
    if (vals.length === 3) {
      vals = vals[0] + vals[0] + vals[1] + vals[1] + vals[2] + vals[2];
    }

    return new this(
      parseInt(vals.substring(0, 2), 16),
      parseInt(vals.substring(2, 4), 16),
      parseInt(vals.substring(4, 6), 16)
    );
  }

  halfBright() {
    const ctor = this.constructor || Color;
    return new ctor(
      Math.round(this.r / 2),
      Math.round(this.g / 2),
      Math.round(this.b / 2)
    );
  }
}

class ColorSubclass extends Color {}- 새 인스턴스가 반환하는 타입에 집중해보자.
ColorSubclass.fromCSS()와colorSubclass.halfBright()은 각각ColorSubclass타입을 반환하게 될 것이다.
[Symbol.species] 를 이용하여 일괄적으로 타입 변경해보기
class Color {
  constructor(r = 0, g = 0, b = 0) {
    this.r = r;
    this.g = g;
    this.b = b;
  }

  static fromCSS(css) {
    const match = /^#?([0-9a-f]{3}|[0-9a-f]{6});?$/i.exec(css);

    if (!match) {
      throw new Error("invalid CSS code: " + css);
    }

    let vals = match[1];
    if (vals.length === 3) {
      vals = vals[0] + vals[0] + vals[1] + vals[1] + vals[2] + vals[2];
    }

    const ctor = (this && this[Symbol.species]) || Color;
    return new ctor(
      parseInt(vals.substring(0, 2), 16),
      parseInt(vals.substring(2, 4), 16),
      parseInt(vals.substring(4, 6), 16)
    );
  }

  halfBright() {
    const ctor =
      (this && this.constructor && this.constructor[Symbol.species]) || Color;
    return new ctor(
      Math.round(this.r / 2),
      Math.round(this.g / 2),
      Math.round(this.b / 2)
    );
  }
}

class ColorSubclass extends Color {
  static get [Symbol.species]() {
    return Color;
  }
}[Symbol.species]를 통해, 한번에 반환 타입을 변경할 수 있는 패턴을 적용했다.- 이 패턴은 표준 라이브러리에서 종종 사용되는데, 보통 정적 메서드에는 사용되지 않는다.
Color를 반환하는ColorWithAlpha.fromCSS()같은 오해의 소지가 있는 코드를 작성할 수 있기 때문이다.
- 이 패턴이 적용된 클래스를 상속하여, 모든 내장 메서드가 어떤 타입을 따르게 할지 오버라이드할 수 있다.
fromCSS()에서는this && this[Symbol.species]를 사용하고,halfBright()에서는this && this.constructor && this.constructor[Symbol.species]을 사용한 이유는 그냥 다양한 케이스를 보여주기 위해서이다. 서로 바꿔도 에러가 나지 않는다.
[Symbol.species] 테스트
class Base {
  constructor(data) {
    this.data = data;
  }

  static get [Symbol.species]() {
    return this;
  }

  // species 패턴을 따르지 않음
  static create(data) {
    const ctor = this || Base;
    return new ctor(data);
  }

  // species 패턴을 따름
  clone() {
    const ctor =
      (this && this.constructor && this.constructor[Symbol.species]) || Base;
    return new ctor(this.data);
  }
}

class Sub1 extends Base {}
class Sub2 extends Base {
  static get [Symbol.species]() {
    return Base;
  }
}

const b = Sub1.create(2); // Sub1
console.log(b);
const bclone = b.clone(); // Sub1
console.log(bclone);

const c = Sub2.create(2); // Sub2
console.log(c);
const cclone = c.clone(); // Base
console.log(cclone);
species 패턴을 따르는 경우, 오버라이드 된 타입 (Base) 을 사용한다.
[Symbol.species] 테스트2 : null 값 반환해보기
class Base {
  constructor(data) {
    this.data = data;
  }

  static get [Symbol.species]() {
    return this;
  }

  // species 패턴을 따르지 않음
  static create(data) {
    const ctor = this || Base;
    return new ctor(data);
  }

  // species 패턴을 따름
  clone() {
    const ctor =
      (this && this.constructor && this.constructor[Symbol.species]) || Base;
    return new ctor(this.data);
  }
}

class Sub1 extends Base {}
class Sub2 extends Base {
  static get [Symbol.species]() {
    return null; // Base 클래스에서 작성해둔 기본 값을 사용한다. 일반적인 내장 클래스는 이렇게 동작한다.
  }
}

const b = Sub1.create(2); // Sub1
console.log(b);
const bclone = b.clone(); // Sub1
console.log(bclone);

const c = Sub2.create(2); // Sub2
console.log(c);
const cclone = c.clone(); // Base
console.log(cclone);
... || Base와 같이 코딩한 이유는Array같은 내장 클래스가 그렇게 하기 때문이다.
내장 객체 상속
- ES2015 에서 내장 객체를 class 로 서브클래싱하는 것이 편해졌다.
class Elements extends Array {
  select(source) {
    if (source) {
      if (typeof source === "string") {
        const list = document.querySelectorAll(source);
        list.forEach((element) => this.push(element));
      } else {
        this.push(source);
      }
    }

    return this;
  }

  style(props) {
    this.forEach((element) => {
      for (const name in props) {
        element.style[name] = props[name];
      }
    });

    return this;
  }
}

new Elements()
  .select("div")
  .style({ color: "green" })
  .slice(1)
.style({ border: "1px solid red" });Array는 이전에 배웠던species패턴을 사용한다.[Symbol.species]를null로 재정의하면, 체인에서.select()의 반환 타입이Array로 변경되어style()메서드를 찾지 못할 것이다.
class Elements extends Array {
  constructor(arg0, ...rest) {
    const firstType = rest.length === 0 && typeof arg0;
    if (firstType === "number") {
      super(arg0);
    } else if (firstType === "string") {
      super(...document.querySelectorAll(arg0));
    } else {
      super(arg0, ...rest);
    }
  }

  style(props) {
    for (const element of this) {
      for (const [name, value] of Object.entries(props)) {
        element.style[name] = value;
      }
    }
    return this;
  }
}

// Usage
new Elements("div")
  .style({ color: "green" })
  .slice(1)
.style({ border: "1px solid red" });- 나중에 배울 기능을 이용해 개선한 버전이다.
super 를 이용할 수 있는 곳
- 메서드에서는
super키워드를 마음껏 이용할 수 있다. - 프로퍼티에 할당된 함수에서는
super키워드를 이용할 수 없다.
class SuperClass {
  test() {
    return "SuperClass's test";
  }
}

class SubClass extends SuperClass {
  test1() {
    return "SubClass's test1: " + super.test();
  }
}

SubClass.prototype.test2 = function () {
  return "SubClass's test2: " + super.test(); // 에러 발생, `super` 키워드를 사용할 수 없다.
};

const obj = new SubClass();
obj.test1();
obj.test2();super클래스를 사용할 수 없는 이유는 속성에 할당된 함수에는 링크가 없기 때문이다.super는[[HomeObject]]라는 포함 함수의 내부 필드에 의존한다.- 자바스크립트 엔진은
[[HomeObject]]필드에서 객체를 가져오고 프로토타입을 가져온 후 아래와 같이 해당 객체에서method속성을 찾는다.
let method = (the running method);
let homeObject = method.[[HomeObject]];
let proto = Object.getPrototypeOf(homeObject);
let value = proto.foo
3계층 구조 살펴보기
class Base {
  test() {
    return "Base test";
  }
}

class Sub extends Base {
  test() {
    return "Sub test> " + super.test();
  }
}

class SubSub extends Sub {
  test() {
    return "SubSub test> " + super.test();
  }
}

const obj = new SubSub();
console.log(obj.test()); // SubSub test> Sub test> Base test- 프로토타입 체인은
obj->SubSub.prototype->Sub.prototype->Base.prototype->Object.prototype순이다.
잘못된 3계층 구조
function getFakeSuper(o) {
  return Object.getPrototypeOf(Object.getPrototypeOf(o));
}

class Base {
  test() {
    console.log("Base's test");
    return "Base test";
  }
}

class Sub extends Base {
  test() {
    console.log("Sub's test");
    return "Sub test> " + getFakeSuper(this).test.call(this);
  }
}

class SubSub extends Sub {
  test() {
    console.log("SubSub's test");
    return "Subsub test> " + getFakeSuper(this).test.call(this);
  }
}

const obj = new SubSub();
console.log(obj.test());this는 계속obj(SubSub) 이다.obj(SubSub) 이기 때문에,getFakeSuper(this).test.call(this)는Sub.test()를 계속하여 호출하게 된다.- Stack overflow 가 일어나게 된다.
그림으로 살펴보기
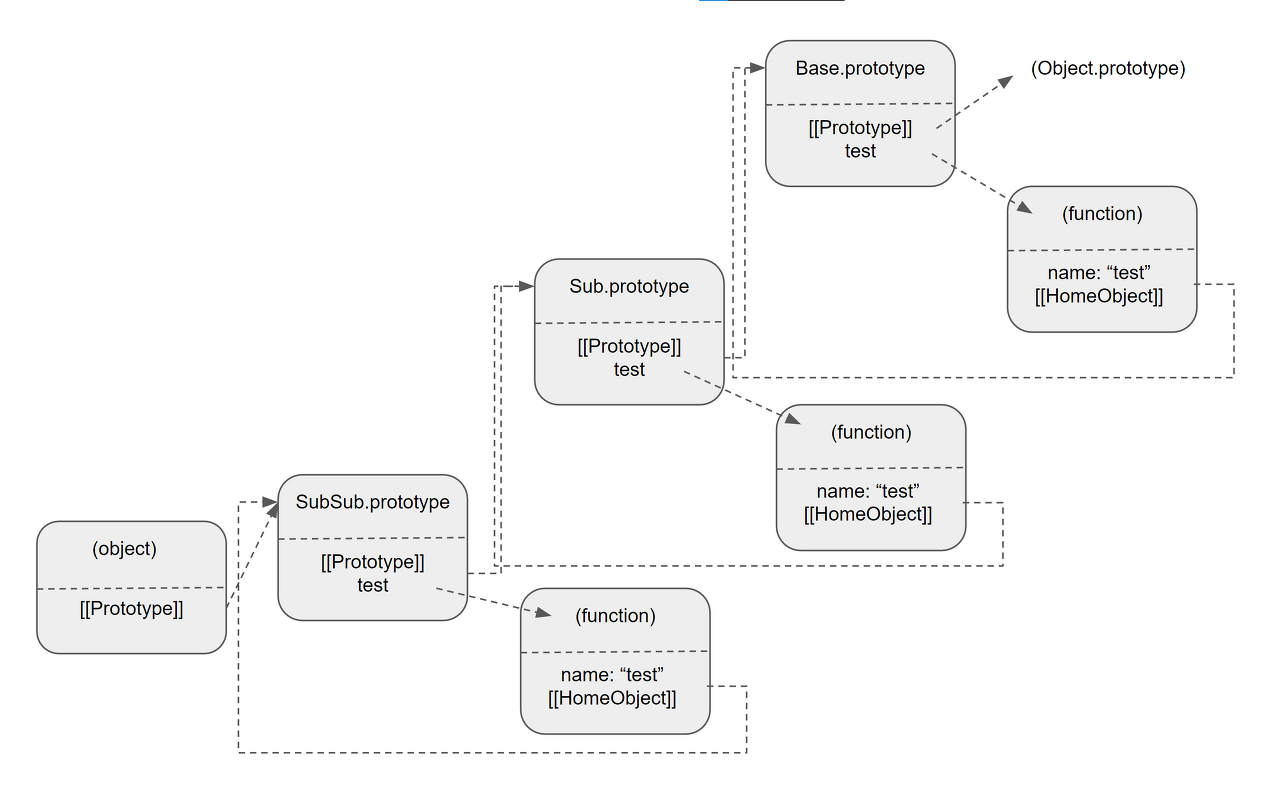
- 위의 그림처럼 각 메서드의
[[HomeObject]]를 통해 다음 프로토타입을 가져오는 방식이 되어야 한다.
mixin 메서드 주의하기
// 믹스인
let sayHiMixin = {
  sayHi() {
    console.log("super", super);
    alert(`Hello ${this.name}`);
  },
  sayBye() {
    console.log("super", super);
    alert(`Bye ${this.name}`);
  },
};

// 사용법:
class User {
  constructor(name) {
    this.name = name;
  }
}

// 메서드 복사
Object.assign(User.prototype, sayHiMixin);

// 이제 User가 인사를 할 수 있습니다.
new User("Dude").sayHi(); // Hello Dude!- 위는 믹스인 코드의 예제이다.
mixin메서드에서는super를 사용하면, 복사된 객체의 프로토타입이 아닌 원래HomeObject의 프로토타입을 계속 사용하므로 주의해야 한다.- 사용한다면, 새로운 계층이 아닌 원래 계층 내에서 계속 작동할 계획일 때 사용하자.
class Animal {
  constructor(name) {
    this.name = name;
  }

  // 부모로 이동된 flyTo, eat, swimAt 메서드
  flyTo(destination) {
    console.log(`${this.name} is flying to the ${destination}`);
  }

  eat(food) {
    console.log(`${this.name} is eating ${food}`);
  }

  swimAt(place) {
    console.log(`${this.name} is swiming at the ${place}`);
  }
}

class Duck extends Animal {}
class Swan extends Animal {}

// 나는 행위를 담당하는 Mixin
const FlyToMixin = (superclass) =>
  class extends superclass {
    flyTo(destination) {
      console.log(`${this.name} is flying to the ${destination}`);
    }
  };

// 먹는 행위를 담당하는 Mixin
const EatMixin = (superclass) =>
  class extends superclass {
    eat(food) {
      console.log(`${this.name} is eating ${food}`);
    }
  };

// 헤엄치는 행위를 담당하는 Mixin
const SwimAtMixin = (superclass) =>
  class extends superclass {
    swimAt(place) {
      console.log(`${this.name} is swiming at the ${place}`);
    }
  };

// 믹스인을 탑재한 Mouse
class Mouse extends SwimAtMixin(EatMixin(Animal)) {
  /*...*/
}

const mickyMouse = new Mouse("Micky Mouse");
mickyMouse.swimAt("river");
Object.prototype 제거하기
class A {
  constructor() {}
}

class B extends Object {
  constructor() {
    super();
  }
}A.prototype의 프로토타입 과B.prototype의 프로토타입 모두Object.prototype이 된다.- 두 클래스는 사실상 동일하다.
class X extends null {}

const o = new X();
console.log(o.toString); // undefined
console.log(Object.getPrototypeOf(X.prototype) === null); // truetoString(),hasOwnProperty()등 오브젝트의 기본 메서드를 원하지 않는다면null을 상속하면 된다.- 몇몇 환경에서는 오류로 판명되는 경우도 있다.
반응형