개요
리액트 네이티브에서 푸시 알람을 보내는 방법을 알아보자.
푸시 알람의 종류
푸시 알람의 종류는 2가지가 있다.
로컬 푸시 알람
푸시 서버를 타지 않고, 앱 자체에서 폰으로 보내는 푸시 알람이다.
로컬 알람도 아래에서 설치하게 될
react-native-push-notification패키지를 통해 보낼 수 있다.
그러므로 로컬 알람과 원격 알람을 따로 설정할 필요 없다.
원격 푸시 알람
푸시 서버를 타고 보내는 푸시 알람이다. 요즘은 FCM (Firebase Cloud Messaging) 이라는 도구를 이용해 푸시 알람을 보내는 것이 일반적이다.
푸시 알람 개발 프로세스
- 리액트 네이티브에 알맞은 푸시알람 npm 패키지 설치
FCM (Firebase Cloud Messaging)에서 키 발급build.gradle을 통해 알맞은 패키지 설치AndroidManifest.xml파일 내부에 푸시알람에 필요한 설정 해주기- 푸시알람 소스코드 작성하기
npm 패키지 설치
# 안드로이드
npm i @react-native-firebase/analytics @react-native-firebase/app @react-native-firebase/messaging
# IOS
npm i react-native-push-notification @react-native-community/push-notification-ios
# Typescript
npm i -D @types/react-native-push-notification
npx pod-install
IOS 와 Android 둘 다 결국
FCM (Firebase Cloud Messaging)을 사용하는 것이 정신건강에 이롭다.
주의:react-native-pusn-notification패키지를 깔았음을 정확히 인지해야 한다. 비슷한 이름의react-native-notifications와 헷갈리면 안 된다.
FCM 이란?
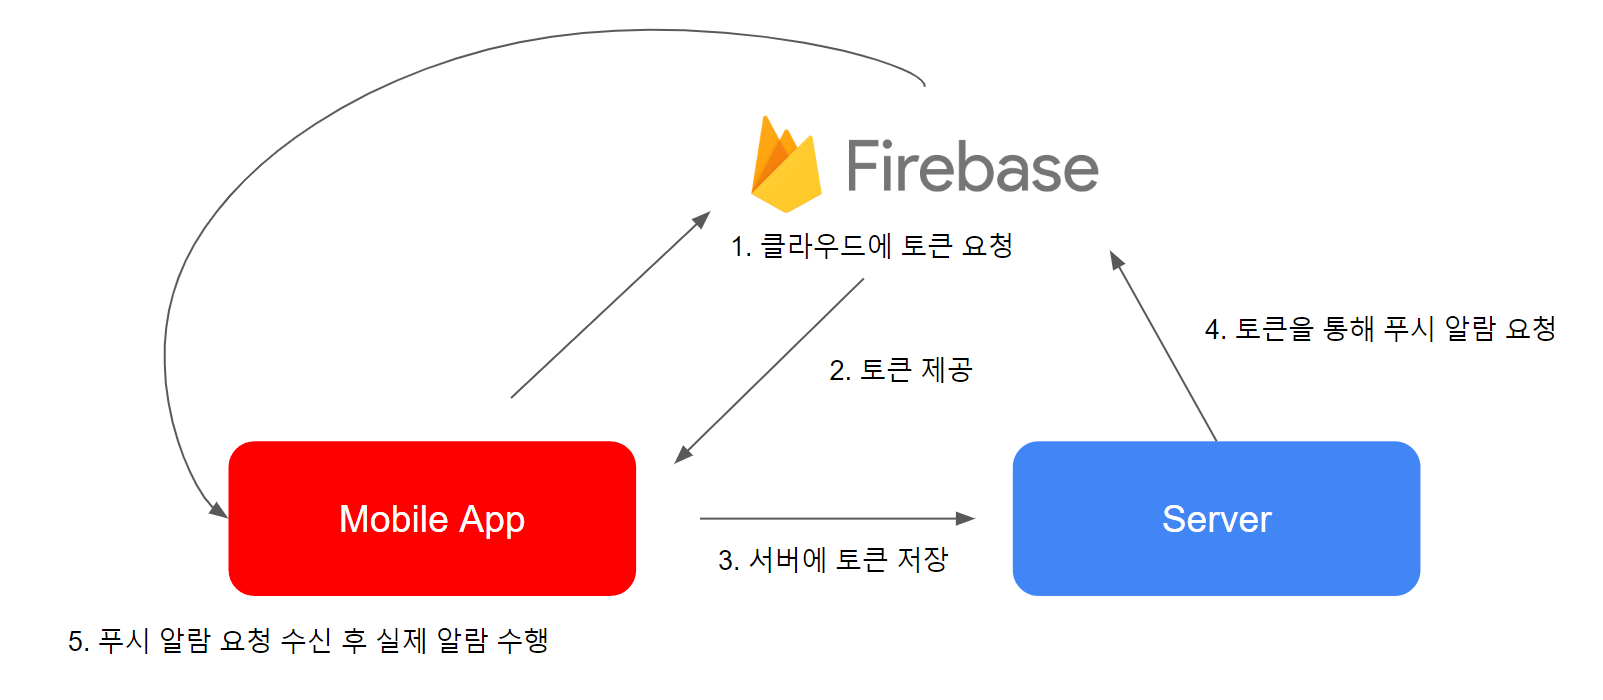
푸시 알람을 편리하게 보낼 수 있도록 해주는 도구라고 생각하면 된다.

위와 같은 과정을 통해 FCM 으로 푸시 알람을 보내게 된다.
FCM 을 이용하기 위해 일련의 절차를 거쳐야 하는데, Firebase Cloud Messaging 키 발급 방법 블로그를 보고 따라하면 된다.
build.gradle 등 설정
이 링크 에서 README.md 문서가 시키는대로 하면 된다.
소스코드 작성
App.tsx 에서 푸시 서버 관련 설정해주기
import PushNotification from "react-native-push-notification";
import PushNotificationIOS from "@react-native-community/push-notification-ios";
import messaging from "@react-native-firebase/messaging";

messaging().setBackgroundMessageHandler(async (remoteMessage) => {
  console.log("Message handled in the background!", remoteMessage);
});

PushNotification.configure({
  // (optional) 토큰이 생성될 때 실행됨(토큰을 서버에 등록할 때 쓸 수 있음)
  // token 을 서버로 보내야 서버가 내가 누군지 알 수 있다. 서버가 이용자의 휴대폰 고유 토큰을 저장해두었다가, 푸시 알림을 통해 알림이 간다.
  onRegister: function (token: any) {
    console.log("TOKEN:", token);
  },

  // (required) 리모트 노티를 수신하거나, 열었거나 로컬 노티를 열었을 때 실행
  // 알림이 와서 알림을 클릭했을 때 실행되는 부분
  onNotification: function (notification: any) {
    console.log("NOTIFICATION:", notification);
    if (notification.channelId === "riders") {
      // 아이폰 안드로이드에 따라 .data.message 냐 .message 냐가 갈림
      // if (notification.message || notification.data.message) {
      // 푸시 알람으로 온 메세지를 한번 더 보여줌
      //   store.dispatch(
      //     userSlice.actions.showPushPopup(
      //       notification.message || notification.data.message,
      //     ),
      //   );
      // }
    }
    // process the notification

    // (required) 리모트 노티를 수신하거나, 열었거나 로컬 노티를 열었을 때 실행
    // 아이폰쪽에서 그냥 필요함
    notification.finish(PushNotificationIOS.FetchResult.NoData);
  },

  // (optional) 등록한 액션을 누렀고 invokeApp이 false 상태일 때 실행됨, true면 onNotification이 실행됨 (Android)
  onAction: function (notification: any) {
    console.log("ACTION:", notification.action);
    console.log("NOTIFICATION:", notification);

    // process the action
  },

  // (optional) Called when the user fails to register for remote notifications. Typically occurs when APNS is having issues, or the device is a simulator. (iOS)
  onRegistrationError: function (err: Error) {
    console.error(err.message, err);
  },

  // IOS ONLY (optional): default: all - Permissions to register.
  permissions: {
    alert: true,
    badge: true,
    sound: true,
  },

  // Should the initial notification be popped automatically
  // default: true
  // 푸시 알람에 대한 권한 요청
  popInitialNotification: true,

  /**
   * (optional) default: true
   * - Specified if permissions (ios) and token (android and ios) will requested or not,
   * - if not, you must call PushNotificationsHandler.requestPermissions() later
   * - if you are not using remote notification or do not have Firebase installed, use this:
   *     requestPermissions: Platform.OS === 'ios'
   */
  requestPermissions: true,
});

// 채널을 통해 푸시알람에 대한 디테일한 설정이 가능하다.
// 공지사항용, 광고용, 단순 알람용 등등 ..
// 유저는 특정 채널을 수신 거부하는 등의 개별 설정이 가능하다.
PushNotification.createChannel(
  {
    channelId: "riders", // (required)
    channelName: "앱 전반", // (required)
    channelDescription: "앱 실행하는 알림", // (optional) default: undefined.
    soundName: "default", // (optional) See `soundName` parameter of `localNotification` function
    importance: 4, // (optional) default: 4. Int value of the Android notification importance
    vibrate: true, // (optional) default: true. Creates the default vibration patten if true.
  },
  (created: boolean) =>
    console.log(`createChannel riders returned '${created}'`) // (optional) callback returns whether the channel was created, false means it already existed.
);
폰 토큰 저장하기
// 토큰 설정
useEffect(() => {
  async function getToken() {
    try {
      // 기기 등록이 안되어있다면, 기기 토큰을 먼저 등록해야 한다.
      if (!messaging().isDeviceRegisteredForRemoteMessages) {
        await messaging().registerDeviceForRemoteMessages();
      }

      // 토큰 가져오기
      const token = await messaging().getToken();
      console.log("phone token", token);

      // 유저 토큰 저장하기
      dispatch(userSlice.actions.setPhoneToken(token));

      return axios.post(`${Config.API_URL}/phonetoken`, { token });
    } catch (error) {
      console.error(error);
    }
  }

  getToken();
}, [dispatch]);'리액트 네이티브 (React Native)' 카테고리의 다른 글
| 리액트 네이티브 Failed to launch emulator 에러 해결하기 (0) | 2022.11.25 |
|---|---|
| 리액트 네이티브 초기 프로젝트 생성 방법 (feat. Expo vs React Native CLI ) (0) | 2022.11.09 |
| 리액트 네이티브 apk 파일 생성하기 (0) | 2022.11.07 |
| 리액트 네이티브, 헤르메스(Hermes) 란? (0) | 2022.11.07 |
| 리액트 네이티브 코드 푸시(Code Push) 란, 그리고 코드 푸시 설정법 (2) | 2022.11.07 |
