
doDispatch() 함수 끝까지 따라가서 HandlerMapping 과 HandlerAdapter 알아보기
- 스프링의 핵심 동작을 담당하는
DispatcherServlet에서 요청 처리에 사용될 핸들러를 찾아주고, 실행할 때 사용된다.HandlerMapping은 요청에 따른 핸들러를 찾아준다.HandlerAdapter는 찾아낸 핸들러를 실행시켜줄Adapter이다.
실제 동작 살펴보기
- 코드와 동작을 디버깅하며 어떤 일이 벌어지는지 살펴보자.
예제 코드
@RestController
public class HelloController {
    @RequestMapping("/")
    public String sayHello() {
        return "Hello, world!";
    }
}- 로컬 환경에서 스프링에 위와 같은 코드를 작성하면, 우리는
localhost:8080/경로로 접근했을 때"Hello, world!"라는 텍스트를 띄워줄 것을 안다. - 이 과정에서 우리 눈엔 보이지 않지만, 스프링 프레임워크는
DispatcherServlet으로 해당 요청을 보내고HandlerMapping과HandlerAdapter를 이용해 해당 요청을 처리한다.
DispatcherServlet 의 초기화 구경하기
참고로
DispatcherServlet이 초기화 되는 시점은 스프링 애플리케이션을 키면서가 아닌 한 번 서블릿의 요청을 받은 이후이다. 그래서 이 초기화 과정이 무겁다면, 스프링을 켠 이후 첫 요청에 대한 응답 시간이 조금 걸리는 편이다. 반면에 이러한 레이지 로딩을 사용하는 덕분에 초기 스프링부트의 실행 시간은 매우 빠르다.
- 처음에 서블릿을 초기화하며
initWebApplicationContext()라는 메서드가 호출된다.- 이는
DispatcherServlet이 상속받는FrameworkServlet에서 이뤄진다. - 이 과정에서
onRefresh()가 호출된다. DispatcherServlet이 구현하는onRefresh()내부에는 여러가지 초기화 메서드가 존재한다.
- 이는
protected void initStrategies(ApplicationContext context) {
  initMultipartResolver(context);
  initLocaleResolver(context);
  initThemeResolver(context);
  initHandlerMappings(context); // 핸들러 매핑 초기화
  initHandlerAdapters(context); // 핸들러 어댑터 초기화
  initHandlerExceptionResolvers(context);
  initRequestToViewNameTranslator(context);
  initViewResolvers(context);
  initFlashMapManager(context);
}- 여기서 다양한
HandlerMapping와HandlerAdapter를 초기화한다.- 다른
Resolver와 같은 것들도 초기화하는데 이는 관심사가 아니므로 일단 무시하겠다.
- 다른
initHandlerMapping() 구경하기
- 아래는
initHandlerMappings()의 소스코드이다.
private void initHandlerMappings(ApplicationContext context) {
  this.handlerMappings = null;

  if (this.detectAllHandlerMappings) {
    // Find all HandlerMappings in the ApplicationContext, including ancestor contexts.
    Map<String, HandlerMapping> matchingBeans =
        BeanFactoryUtils.beansOfTypeIncludingAncestors(context, HandlerMapping.class, true, false);
    if (!matchingBeans.isEmpty()) {
      this.handlerMappings = new ArrayList<>(matchingBeans.values());
      // We keep HandlerMappings in sorted order.
      AnnotationAwareOrderComparator.sort(this.handlerMappings);
    }
  }
  else {
    try {
      HandlerMapping hm = context.getBean(HANDLER_MAPPING_BEAN_NAME, HandlerMapping.class);
      this.handlerMappings = Collections.singletonList(hm);
    }
    catch (NoSuchBeanDefinitionException ex) {
      // Ignore, we'll add a default HandlerMapping later.
    }
  }

  // Ensure we have at least one HandlerMapping, by registering
  // a default HandlerMapping if no other mappings are found.
  if (this.handlerMappings == null) {
    this.handlerMappings = getDefaultStrategies(context, HandlerMapping.class);
    if (logger.isTraceEnabled()) {
      logger.trace("No HandlerMappings declared for servlet '" + getServletName() +
          "': using default strategies from DispatcherServlet.properties");
    }
  }
}BeanFactoryUtils.beansOfTypeIncludingAncestors()메서드는 특정 타입 혹은 특정 타입을 상속한 타입까지 찾아Map형태로 반환해주는 역할을 한다.- 여기서 자동으로 아래의 빈이 검출된다.
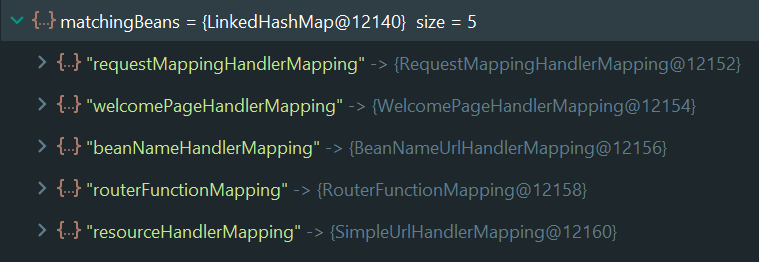
- 여기서 검출된
HandlerMapping은 추후AnnotationAwareOrderComparator를 통해 정렬된다.HandlerMapping에도@Order등을 통해 먼저 동작할 것을 설정할 수 있기 때문이다.- 위의
initHandlerMappings()소스코드에서도 구경해볼 수 있다.

- 위는
AnnotationAwareOrderComparator를 통해 정렬된 후의 모습이다. - 당연히 스프링 사용자도
HandlerMapping타입의 빈을 만들어DispatcherServlet에서 사용되게 만들 수 있다. - 위에서 가장 중요한
HandlerMapping은 우선순위도 가장 높은RequestMappingHandlerMapping이다.
RequestMappingHandlerMapping 구경하기
- 이
HandlerMapping이 가장 중요한 이유는 우리가 가장 흔하게 구경하는@Controller애너테이션이 붙은 클래스 내부에 존재하는@RequestMapping애너테이션이 붙은 메서드를 '처리한다.' - '처리한다.'는 것을 구체적으로 설명하자면,
RequestMappingInfo객체를 생성하여 '어떤 요청이 들어왔을 때, 해당 요청이 조건에 맞는 요청인지 확인하고, 조건에 맞다면, 해당 요청은 이HandlerMapping을 통해 처리할 수 있다.' 라는 것을 알려주는 역할을 해준다.RequestMappingInfo는 처리할 수 있는 HTTP 요청 메서드, 요청 경로 등을 가지고 있어서 해당 요청을 처리할 수 있는지에 대한 정보를 가지고 있다.
initHandlerAdapters 구경하기
private void initHandlerAdapters(ApplicationContext context) {
  this.handlerAdapters = null;

  if (this.detectAllHandlerAdapters) {
    // Find all HandlerAdapters in the ApplicationContext, including ancestor contexts.
    Map<String, HandlerAdapter> matchingBeans =
        BeanFactoryUtils.beansOfTypeIncludingAncestors(context, HandlerAdapter.class, true, false);
    if (!matchingBeans.isEmpty()) {
      this.handlerAdapters = new ArrayList<>(matchingBeans.values());
      // We keep HandlerAdapters in sorted order.
      AnnotationAwareOrderComparator.sort(this.handlerAdapters);
    }
  }
  else {
    try {
      HandlerAdapter ha = context.getBean(HANDLER_ADAPTER_BEAN_NAME, HandlerAdapter.class);
      this.handlerAdapters = Collections.singletonList(ha);
    }
    catch (NoSuchBeanDefinitionException ex) {
      // Ignore, we'll add a default HandlerAdapter later.
    }
  }

  // Ensure we have at least some HandlerAdapters, by registering
  // default HandlerAdapters if no other adapters are found.
  if (this.handlerAdapters == null) {
    this.handlerAdapters = getDefaultStrategies(context, HandlerAdapter.class);
    if (logger.isTraceEnabled()) {
      logger.trace("No HandlerAdapters declared for servlet '" + getServletName() +
          "': using default strategies from DispatcherServlet.properties");
    }
  }
}- 전체적인 로직은
initHandlerMappings()와 거의 동일하다. - 다만
HandlerMapping을 찾지 않고,HandlerAdapter타입의 빈을 찾을 뿐이다.
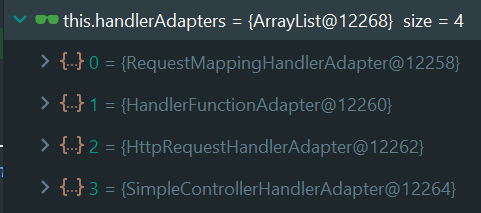
- 위는 발견된
HandlerAdapter빈들이다.- 이 중에서도 당연히
RequestMappingHandlerAdapter가 가장 중요하다.
- 이 중에서도 당연히
RequestMappingHandlerAdapter 구경하기
- 우리가
@Controller,@RequestMapping애너테이션을 통해 등록한 메서드를 실제로 실행시켜주는 어댑터이다. - 이는 추상 클래스인
AbstractHandlerMethodAdapter를 구현한 것으로 가장 중요한 메서드는handleInternal()이다.
@Nullable
protected ModelAndView invokeHandlerMethod(HttpServletRequest request,
    HttpServletResponse response, HandlerMethod handlerMethod) throws Exception {

  ServletWebRequest webRequest = new ServletWebRequest(request, response);
  try {
    WebDataBinderFactory binderFactory = getDataBinderFactory(handlerMethod);
    ModelFactory modelFactory = getModelFactory(handlerMethod, binderFactory);

    ServletInvocableHandlerMethod invocableMethod = createInvocableHandlerMethod(handlerMethod);
    if (this.argumentResolvers != null) {
      invocableMethod.setHandlerMethodArgumentResolvers(this.argumentResolvers);
    }
    if (this.returnValueHandlers != null) {
      invocableMethod.setHandlerMethodReturnValueHandlers(this.returnValueHandlers);
    }
    invocableMethod.setDataBinderFactory(binderFactory);
    invocableMethod.setParameterNameDiscoverer(this.parameterNameDiscoverer);

    ModelAndViewContainer mavContainer = new ModelAndViewContainer();
    mavContainer.addAllAttributes(RequestContextUtils.getInputFlashMap(request));
    modelFactory.initModel(webRequest, mavContainer, invocableMethod);
    mavContainer.setIgnoreDefaultModelOnRedirect(this.ignoreDefaultModelOnRedirect);

    AsyncWebRequest asyncWebRequest = WebAsyncUtils.createAsyncWebRequest(request, response);
    asyncWebRequest.setTimeout(this.asyncRequestTimeout);

    WebAsyncManager asyncManager = WebAsyncUtils.getAsyncManager(request);
    asyncManager.setTaskExecutor(this.taskExecutor);
    asyncManager.setAsyncWebRequest(asyncWebRequest);
    asyncManager.registerCallableInterceptors(this.callableInterceptors);
    asyncManager.registerDeferredResultInterceptors(this.deferredResultInterceptors);

    if (asyncManager.hasConcurrentResult()) {
      Object result = asyncManager.getConcurrentResult();
      mavContainer = (ModelAndViewContainer) asyncManager.getConcurrentResultContext()[0];
      asyncManager.clearConcurrentResult();
      LogFormatUtils.traceDebug(logger, traceOn -> {
        String formatted = LogFormatUtils.formatValue(result, !traceOn);
        return "Resume with async result [" + formatted + "]";
      });
      invocableMethod = invocableMethod.wrapConcurrentResult(result);
    }

    invocableMethod.invokeAndHandle(webRequest, mavContainer);
    if (asyncManager.isConcurrentHandlingStarted()) {
      return null;
    }

    return getModelAndView(mavContainer, modelFactory, webRequest);
  }
  finally {
    webRequest.requestCompleted();
  }
}- 겉보기엔 살짝 방대하고 어지러워보일 수 있는데, 실질적으로 우리가 작성한
@RequestMapping애너테이션을 단 메서드가 동작할 수 있게 해주는 역할을 한다. - 가장 중요한 역할을 하는 것이 두개 있는데, 첫번째가
ArgumentResolver이고, 두번째가ReturnValueResolver이다.ArgumentResolver는 우리가@RequestParam("id") String id와 같이 파라미터를 줬을 때, HTTP 통신 요청 값 중 이에 해당하는 값을 가져와 파싱해서id라는 파라미터에 직접 문자열로 넣어준다.ReturnValueResolver는 우리가@RequestMapping에서 반환한 타입을 확인하여, 실제로 어떤 응답을 할지 결정한다.@Controller클래스 내부의@RequestMapping메서드에서String을 반환한다면,ViewResolver에서 알맞은.jsp페이지를 찾아 반환할 수 있다.@RestController클래스 내부의@RequestMapping메서드에서String을 반환하면,Content-Type을text/plain으로 설정하고 단순 텍스트만 존재하는 페이지를 반환할 수도 있다.
DispatcherServlet 의 doDispatch() 에 브레이크 포인트 걸어보기
doDispatch()에 브레이크 포인트를 거는 이유는DispatchServlet의 사실상 핵심 동작을 담당하는 메서드이기 때문이다.- 기본적으로 우리가 스프링 프레임워크를 이용해 개발하는 일은 서블릿 컨테이너인 톰캣이 구현하는
HttpServlet에 있는 메서드들을 상속해 조건에 맞는 요청이 들어왔을 때 작성한 비즈니스 로직을 통해 의도한 동작을 수행하고 응답을 주는 것이다.
- 기본적으로 우리가 스프링 프레임워크를 이용해 개발하는 일은 서블릿 컨테이너인 톰캣이 구현하는
DispatcherServlet은HttpServlet을 상속하는FrameworkServlet을 상속한다.FrameworkServlet은 모든 HTTP 요청을processRequest()라는 메서드에서 처리한다.processRequest()내부에는doService()라는 추상 메서드를 통해 핵심 로직을 구현할 수 있게 되어있다.doService()는FrameworkServlet을 상속받은DispatcherServlet에서 구현되는데, 모든 요청 처리에 공통으로 적용되는 로직을 제외하면, 사실상의 핵심 로직은doDispatch()에서 구현하고 있다.- 그래서
doDispatch()에 브레이크 포인트를 걸면 사실상의 요청에 대한 응답이 스프링에서 어떻게 처리되는지에 대한 핵심 로직을 구경해볼 수 있다.
DispatcherServlet 의 doDispatch() 구경하기
protected void doDispatch(HttpServletRequest request, HttpServletResponse response) throws Exception {
  HttpServletRequest processedRequest = request;
  HandlerExecutionChain mappedHandler = null;
  boolean multipartRequestParsed = false;

  WebAsyncManager asyncManager = WebAsyncUtils.getAsyncManager(request);

  try {
    ModelAndView mv = null;
    Exception dispatchException = null;

    try {
      processedRequest = checkMultipart(request);
      multipartRequestParsed = (processedRequest != request);

      // Determine handler for the current request.
      mappedHandler = getHandler(processedRequest);
      if (mappedHandler == null) {
        noHandlerFound(processedRequest, response);
        return;
      }

      // Determine handler adapter for the current request.
      HandlerAdapter ha = getHandlerAdapter(mappedHandler.getHandler());

      // Process last-modified header, if supported by the handler.
      String method = request.getMethod();
      boolean isGet = "GET".equals(method);
      if (isGet || "HEAD".equals(method)) {
        long lastModified = ha.getLastModified(request, mappedHandler.getHandler());
        if (new ServletWebRequest(request, response).checkNotModified(lastModified) && isGet) {
          return;
        }
      }

      if (!mappedHandler.applyPreHandle(processedRequest, response)) {
        return;
      }

      // Actually invoke the handler.
      mv = ha.handle(processedRequest, response, mappedHandler.getHandler());

      if (asyncManager.isConcurrentHandlingStarted()) {
        return;
      }

      applyDefaultViewName(processedRequest, mv);
      mappedHandler.applyPostHandle(processedRequest, response, mv);
    }
    catch (Exception ex) {
      dispatchException = ex;
    }
    catch (Throwable err) {
      // As of 4.3, we're processing Errors thrown from handler methods as well,
      // making them available for @ExceptionHandler methods and other scenarios.
      dispatchException = new NestedServletException("Handler dispatch failed", err);
    }
    processDispatchResult(processedRequest, response, mappedHandler, mv, dispatchException);
  }
  catch (Exception ex) {
    triggerAfterCompletion(processedRequest, response, mappedHandler, ex);
  }
  catch (Throwable err) {
    triggerAfterCompletion(processedRequest, response, mappedHandler,
        new NestedServletException("Handler processing failed", err));
  }
  finally {
    if (asyncManager.isConcurrentHandlingStarted()) {
      // Instead of postHandle and afterCompletion
      if (mappedHandler != null) {
        mappedHandler.applyAfterConcurrentHandlingStarted(processedRequest, response);
      }
    }
    else {
      // Clean up any resources used by a multipart request.
      if (multipartRequestParsed) {
        cleanupMultipart(processedRequest);
      }
    }
  }
}- 보기엔 장황해보여도 핵심 동작을 요약하면 간단하다.
getHandler()- 핸들러 매핑을 통해 핸들러 메서드를 찾는다.
getHandlerAdapter()- 핸들러 메서드를 실행시켜줄 핸들러 어댑터를 찾는다.
handlerAdapter.handle()- 핸들러 어댑터를 통해 핸들러를 실행한다.
- 위의 동작이 끝이다. 하나하나 순서대로 살펴보자.
DispatcherServlet 의 getHandler() 구경하기
@Nullable
protected HandlerExecutionChain getHandler(HttpServletRequest request) throws Exception {
  if (this.handlerMappings != null) {
    for (HandlerMapping mapping : this.handlerMappings) {
      HandlerExecutionChain handler = mapping.getHandler(request);
      if (handler != null) {
        return handler;
      }
    }
  }
  return null;
}DispatcherServlet내부의getHandler()메서드이다.HandlerMapping을 순회하며request를 인자로getHandler()를 계속 호출하는 게 동작의 전부이다.HandlerExecutionChain을 찾으면 거기서 핸들러를 반환하고 끝난다.
AbstractHandlerMapping 의 getHandler() 구경하기
- 위의
getHandler()를 따라가다보면 실제로 구현한 클래스가AbstractHandlerMapping이라는 것을 발견하게 된다.AbstractHandlerMapping는getHandlerInternal()구현을 떠넘기는 방식으로getHandler()를 구현해두었다.
- 따라가다보면
AbstractHandlerMethodMapping에서getHandlerInternal()을 구현해두었다.- 그리고 구현은 아래와 같다.
AbstractHandlerMethodMapping.getHandlerInternal() 구경하기
@Override
protected HandlerMethod getHandlerInternal(HttpServletRequest request) throws Exception {
  String lookupPath = getUrlPathHelper().getLookupPathForRequest(request);
  request.setAttribute(LOOKUP_PATH, lookupPath);
  this.mappingRegistry.acquireReadLock();
  try {
    HandlerMethod handlerMethod = lookupHandlerMethod(lookupPath, request);
    return (handlerMethod != null ? handlerMethod.createWithResolvedBean() : null);
  }
  finally {
    this.mappingRegistry.releaseReadLock();
  }
}request가 어떤 경로를 향하는지 확인하고, 해당 경로에 해당하는 핸들러 메서드를lookupHandlerMethod를 통해 찾는다.- 이게 가능한 이유는
AbstractHandlerMethodMapping.afterPropertiesSet()메서드에서 모든 핸들러 메서드를 전부AbstractHandlerMethodMapping.mappingRegistry에 등록해놓았기 때문이다.
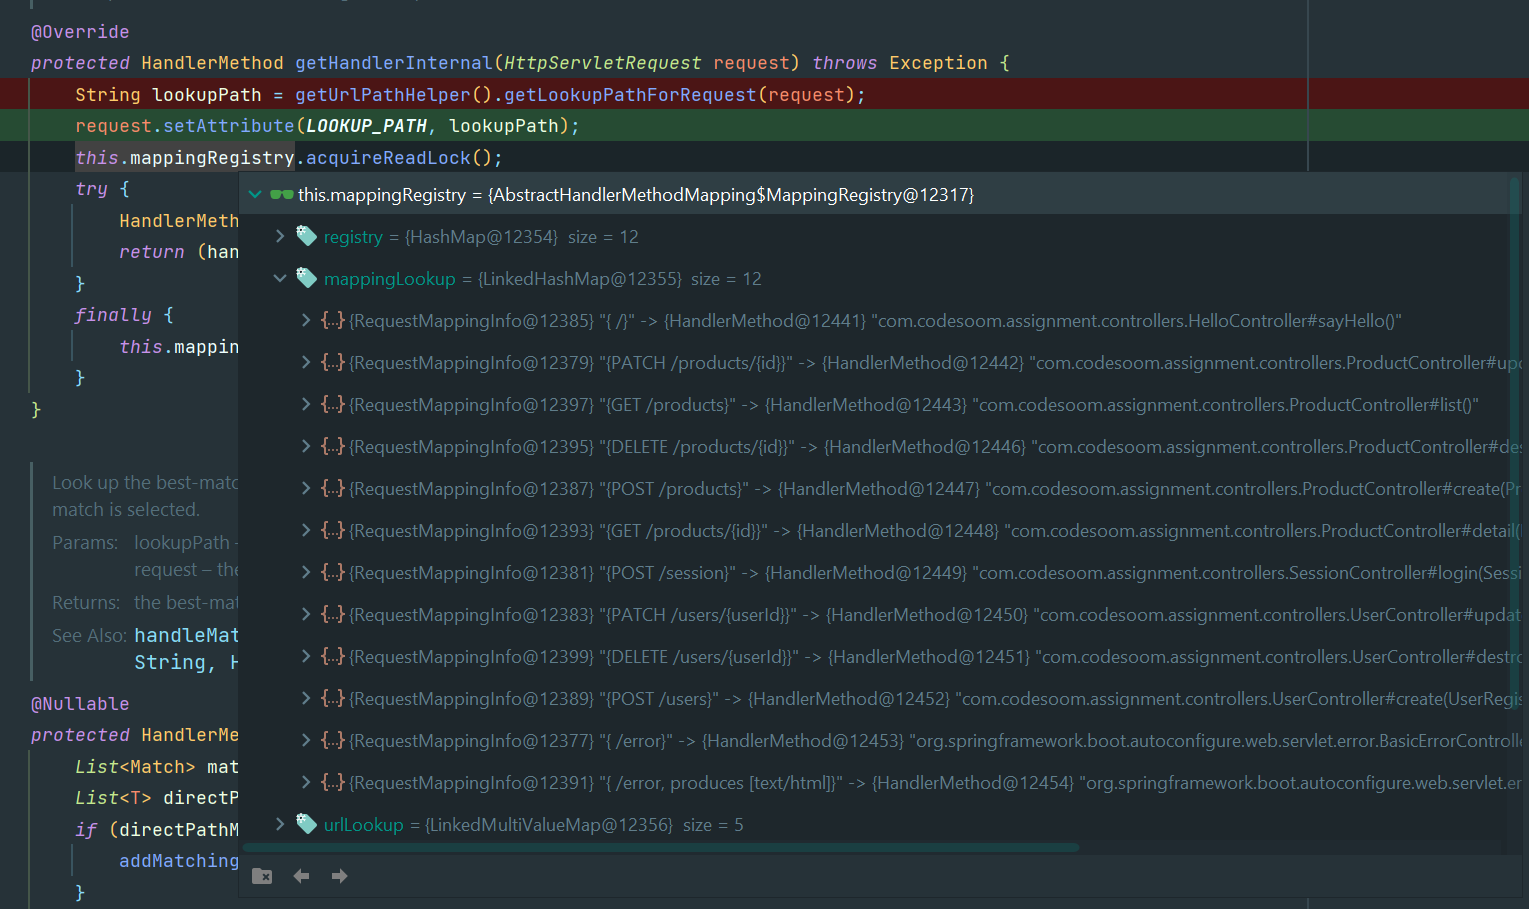
- 생성한 모든 핸들러 메서드가 여기 들어있다.
getHandlerInternal()메서드 내부에 존재하는lookupHandlerMethod()메서드가 해당하는 핸들러를 찾아낸다.
@Nullable
protected HandlerMethod lookupHandlerMethod(String lookupPath, HttpServletRequest request) throws Exception {
  List<Match> matches = new ArrayList<>();
  List<T> directPathMatches = this.mappingRegistry.getMappingsByUrl(lookupPath);
  if (directPathMatches != null) {
    addMatchingMappings(directPathMatches, matches, request);
  }
  if (matches.isEmpty()) {
    // No choice but to go through all mappings...
    addMatchingMappings(this.mappingRegistry.getMappings().keySet(), matches, request);
  }

  if (!matches.isEmpty()) {
    Match bestMatch = matches.get(0);
    if (matches.size() > 1) {
      Comparator<Match> comparator = new MatchComparator(getMappingComparator(request));
      matches.sort(comparator);
      bestMatch = matches.get(0);
      if (logger.isTraceEnabled()) {
        logger.trace(matches.size() + " matching mappings: " + matches);
      }
      if (CorsUtils.isPreFlightRequest(request)) {
        return PREFLIGHT_AMBIGUOUS_MATCH;
      }
      Match secondBestMatch = matches.get(1);
      if (comparator.compare(bestMatch, secondBestMatch) == 0) {
        Method m1 = bestMatch.handlerMethod.getMethod();
        Method m2 = secondBestMatch.handlerMethod.getMethod();
        String uri = request.getRequestURI();
        throw new IllegalStateException(
            "Ambiguous handler methods mapped for '" + uri + "': {" + m1 + ", " + m2 + "}");
      }
    }
    request.setAttribute(BEST_MATCHING_HANDLER_ATTRIBUTE, bestMatch.handlerMethod);
    handleMatch(bestMatch.mapping, lookupPath, request);
    return bestMatch.handlerMethod;
  }
  else {
    return handleNoMatch(this.mappingRegistry.getMappings().keySet(), lookupPath, request);
  }
}- 가장 처음에는 경로를 통해 찾는데, 그게 바로 위의 소스코드에서도 볼 수 있듯,
getMappingsByUrl()이다.- 그런데 단순히 URL 정보로만 찾으면 해당되는 핸들러가 많이 나올 수 있다.
- 이를테면
/user경로에POST,GET,PATCH등의 HTTP 메서드에 각각 작성된 핸들러도 있을 것이다. - 일단은
matches()라는 곳에 핸들러를 전부 몰아놓는다.
- 단순 URL을 통해 매칭되는 핸들러가 1개 보다 많다면,
RequestMappingInfo에 존재하는 아래compareTo()함수에 의해 어떤 것이 우선순위가 높은지 따져보게 된다.
@Override
public int compareTo(RequestMappingInfo other, HttpServletRequest request) {
  int result;
  // Automatic vs explicit HTTP HEAD mapping
  if (HttpMethod.HEAD.matches(request.getMethod())) {
    result = this.methodsCondition.compareTo(other.getMethodsCondition(), request);
    if (result != 0) {
      return result;
    }
  }
  result = this.patternsCondition.compareTo(other.getPatternsCondition(), request);
  if (result != 0) {
    return result;
  }
  result = this.paramsCondition.compareTo(other.getParamsCondition(), request);
  if (result != 0) {
    return result;
  }
  result = this.headersCondition.compareTo(other.getHeadersCondition(), request);
  if (result != 0) {
    return result;
  }
  result = this.consumesCondition.compareTo(other.getConsumesCondition(), request);
  if (result != 0) {
    return result;
  }
  result = this.producesCondition.compareTo(other.getProducesCondition(), request);
  if (result != 0) {
    return result;
  }
  // Implicit (no method) vs explicit HTTP method mappings
  result = this.methodsCondition.compareTo(other.getMethodsCondition(), request);
  if (result != 0) {
    return result;
  }
  result = this.customConditionHolder.compareTo(other.customConditionHolder, request);
  if (result != 0) {
    return result;
  }
  return 0;
}- 메서드, 패턴, 파라미터, 헤더 등 여러가지를 따져보는 것을 확인할 수 있다.
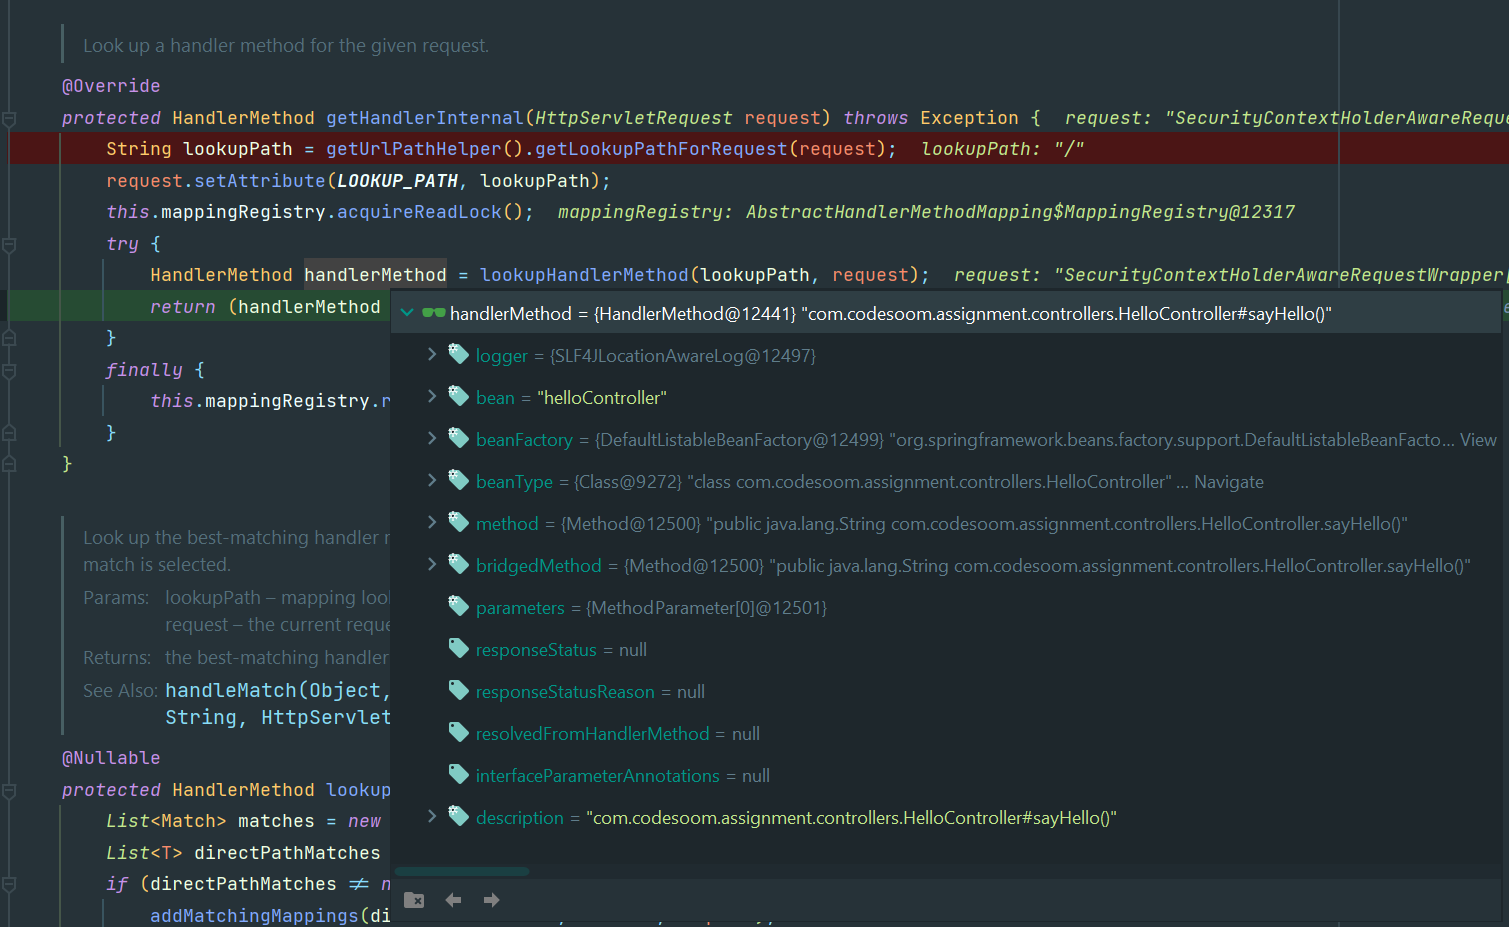
- 우리의 소스코드 예제에서는 URL 로 매칭시켜도 매칭되는 핸들러가 한 개 뿐이라서, 매칭된 핸들러 메서드가
handlerMethod에 들어간 것을 확인할 수 있다.
다시 AbstractHandlerMapping 의 getHandler() 로 돌아오기
getHandlerInternal()메서드의 구현을 둘러보다가 너무 먼데까지 다녀왔다.- 여태까지의 동작을 요약하면
mappingRegistry에서 요청 경로에 따라 적합한 핸들러 메서드를 가져왔다.- 그게 바로 우리가 처음에 작성했던 아래의 메서드이다.
@RestController
public class HelloController {
    @RequestMapping("/")
    public String sayHello() {
        return "Hello, world!";
    }
}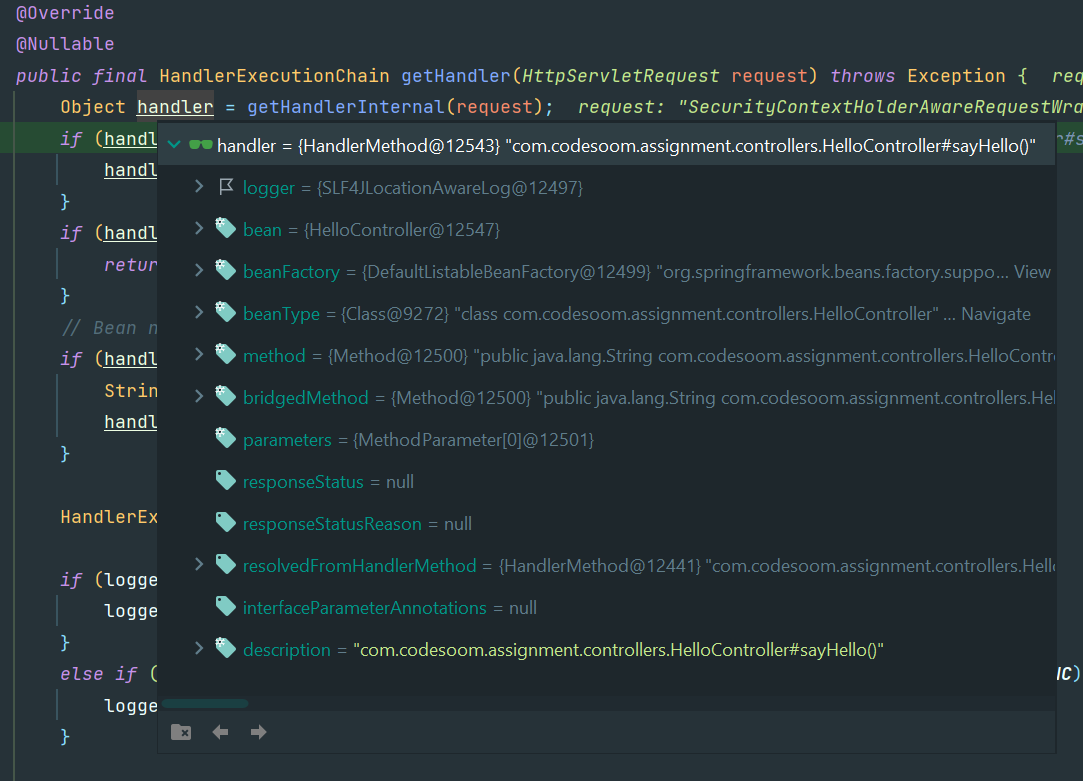
- 디버그 결과 화면에서도 잘 보인다.
- 이 핸들러 메서드를 그냥 반환하면 좋겠지만, 아직 한가지 절차가 더 남았다.
- 스프링에는 인터셉터라는 것이 존재한다.
- 인터셉터는 꼭 거쳐가야 하는 경로 정도로 보면 된다.
- 이를테면 로그인이 필요한 경로에 접근하려고 하면 회원인증 인터셉터를 먼저 거쳐야 한다.
- 로그인 정보가 없으면, 로그인창으로 쫓아내는 역할을 할 수 있다.
- 그래서 핸들러를
HandlerExecutionChain으로 만드는getHandlerExecutionChain()메서드를 실행하는 절차를 밟아야 한다.
protected HandlerExecutionChain getHandlerExecutionChain(Object handler, HttpServletRequest request) {
  HandlerExecutionChain chain = (handler instanceof HandlerExecutionChain ?
      (HandlerExecutionChain) handler : new HandlerExecutionChain(handler));

  String lookupPath = this.urlPathHelper.getLookupPathForRequest(request, LOOKUP_PATH);
  for (HandlerInterceptor interceptor : this.adaptedInterceptors) {
    if (interceptor instanceof MappedInterceptor) {
      MappedInterceptor mappedInterceptor = (MappedInterceptor) interceptor;
      if (mappedInterceptor.matches(lookupPath, this.pathMatcher)) {
        chain.addInterceptor(mappedInterceptor.getInterceptor());
      }
    }
    else {
      chain.addInterceptor(interceptor);
    }
  }
  return chain;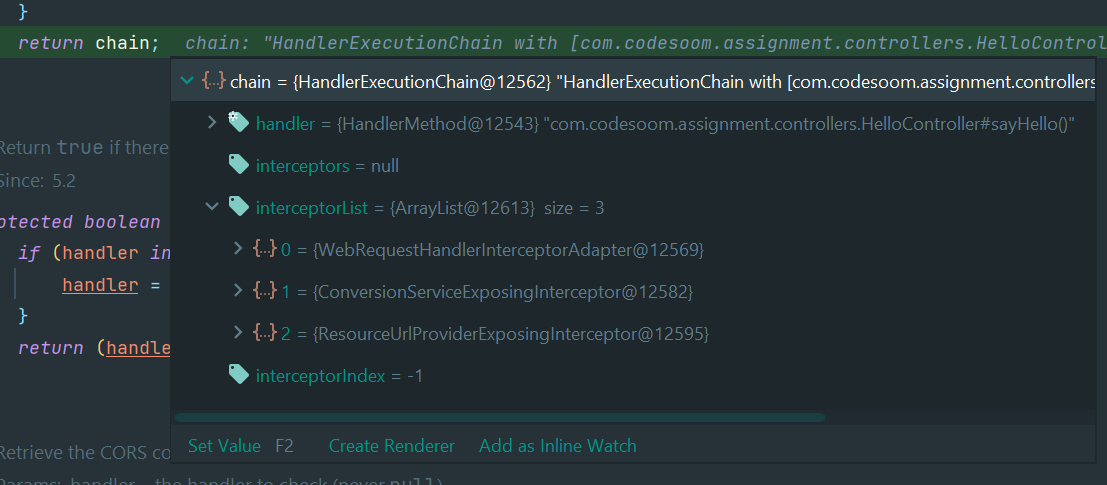
}- 이 절차가 끝나면, 거쳐야 하는 인터셉터가 모두 달라붙어서
HandlerExecutionChain이 된다.
다시 DispatcherServlet.doDispatch() 로 돌아오기
@Nullable
protected HandlerExecutionChain getHandler(HttpServletRequest request) throws Exception {
  if (this.handlerMappings != null) {
    for (HandlerMapping mapping : this.handlerMappings) {
      HandlerExecutionChain handler = mapping.getHandler(request);
      if (handler != null) {
        return handler;
      }
    }
  }
  return null;
}getHandler()의 동작을 분석하기 위해 멀리까지 다녀왔다.- 이제
getHandler()메서드에서 무사히HandlerExecutionChain을 얻었다.
HandlerAdapter ha = getHandlerAdapter(mappedHandler.getHandler());- 핵심 동작 중 두번째인
getHandlerAdapter는 어떻게 동작하는지 알아보자.
DispatcherServlet.getHandlerAdapter() 구경하기
protected HandlerAdapter getHandlerAdapter(Object handler) throws ServletException {
  if (this.handlerAdapters != null) {
    for (HandlerAdapter adapter : this.handlerAdapters) {
      if (adapter.supports(handler)) {
        return adapter;
      }
    }
  }
  throw new ServletException("No adapter for handler [" + handler +
      "]: The DispatcherServlet configuration needs to include a HandlerAdapter that supports this handler");
}handlerAdapters에 등록된HandlerAdapter를 순회하며support()메서드를 수행해보고 지원하는 핸들러를 반환한다.
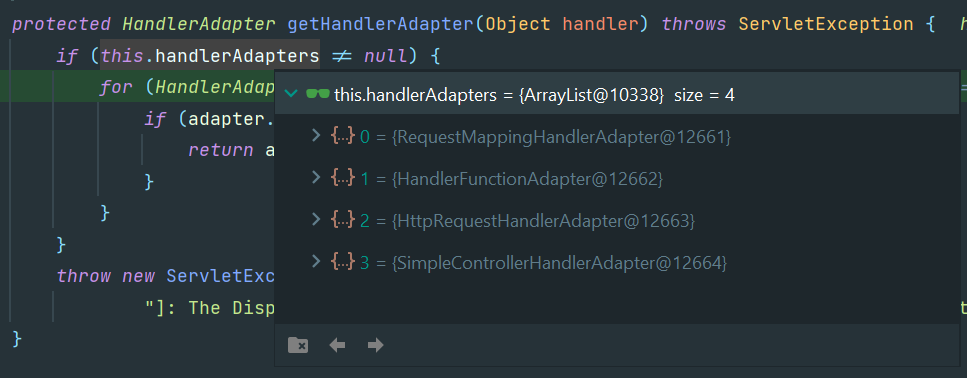
- 등록된
HandlerAdapter는 위와 같다. - 첫 번째로 지원하는지 검사할
HandlerAdapter는RequestMappingHandlerAdapter이다.
AbstractHandlerMethodAdapter.supports() 구경하기
@Override
public final boolean supports(Object handler) {
  return (handler instanceof HandlerMethod && supportsInternal((HandlerMethod) handler));
}RequestMappingHandlerAdapter의supports()메서드는 직접 구현한 것이 아니라AbstractHandlerMethodAdapter.supports()에서 구현한 것을 상속했다.RequestMappingHandlerAdapter는HandlerMethod만 실행할 수 있으므로handler가HandlerMethod의 한 종류인지 확인한다.- 구체적인 내부 로직은
supportsInternal()에 숨겨두었다.
RequestMappingHandlerAdapter.supportsInternal() 구경하기
@Override
protected boolean supportsInternal(HandlerMethod handlerMethod) {
  return true;
}- 그냥
true를 반환하게 되어있다. - 사실
HandlerMethod타입이면 크게 문제가 없던 것이다.- 정확한 이유는 해당 메서드의 주석에 나와있다.
다시 DispatcherServlet.doDispatch() 로 돌아오기
- 이제
Handler를 실행해줄HandlerAdapter도 찾았다. - 실행만 하면 된다.
String method = request.getMethod();
boolean isGet = "GET".equals(method);
if (isGet || "HEAD".equals(method)) {
  long lastModified = ha.getLastModified(request, mappedHandler.getHandler());
  if (new ServletWebRequest(request, response).checkNotModified(lastModified) && isGet) {
    return;
  }
}- 우리가 요청한 HTTP 메서드는
GET메서드이기 때문에, 캐시로 처리할 수 있는지 확인해야 한다. - 그래서
lastModified를 확인하는 부분이 있다. RequestMappingHandlerAdapter.getLastModified()는AbstractHandlerMethodAdapter에 구현되어 있는 것을 사용한다.
AbstractHandlerMethodAdapter.getLastModified() 구경하기
@Override
public final long getLastModified(HttpServletRequest request, Object handler) {
  return getLastModifiedInternal(request, (HandlerMethod) handler);
}- 또 로직을 안쪽으로 숨겨놨다. 안으로 들어가보자.
RequestMappingHandlerAdapter.getLastModifiedInternal() 구경하기
@Override
protected long getLastModifiedInternal(HttpServletRequest request, HandlerMethod handlerMethod) {
  return -1;
}- 무조건
-1을 반환하게 해두었다. - 왜냐하면
RequestMappingHandlerAdapter을 만나는 것보다 앞단인WebRequest에서 이미WebRequest.checkNotModified()메서드를 통해 검증했기 때문이다.
다시 DispatcherServlet.doDispatch() 로 돌아오기
mv = ha.handle(processedRequest, response, mappedHandler.getHandler());- 이제는 위의 코드를 통해 실제로 핸들러를 실행할 차례이다.
AbstractHandlerMethodAdapter.handle() 구경하기
@Override
@Nullable
public final ModelAndView handle(HttpServletRequest request, HttpServletResponse response, Object handler)
    throws Exception {

  return handleInternal(request, response, (HandlerMethod) handler);
}handle()메서드는AbstractHandlerMethodAdapter에서 구현한 것을 사용한다.- 여기에서는 형변환만 하고 실제 구현은 떠넘긴다.
RequestMappingHandlerAdapter.handleInternal() 구경하기
@Override
protected ModelAndView handleInternal(HttpServletRequest request,
    HttpServletResponse response, HandlerMethod handlerMethod) throws Exception {

  ModelAndView mav;
  checkRequest(request);

  // Execute invokeHandlerMethod in synchronized block if required.
  if (this.synchronizeOnSession) {
    HttpSession session = request.getSession(false);
    if (session != null) {
      Object mutex = WebUtils.getSessionMutex(session);
      synchronized (mutex) {
        mav = invokeHandlerMethod(request, response, handlerMethod);
      }
    }
    else {
      // No HttpSession available -> no mutex necessary
      mav = invokeHandlerMethod(request, response, handlerMethod);
    }
  }
  else {
    // No synchronization on session demanded at all...
    mav = invokeHandlerMethod(request, response, handlerMethod);
  }

  if (!response.containsHeader(HEADER_CACHE_CONTROL)) {
    if (getSessionAttributesHandler(handlerMethod).hasSessionAttributes()) {
      applyCacheSeconds(response, this.cacheSecondsForSessionAttributeHandlers);
    }
    else {
      prepareResponse(response);
    }
  }

  return mav;
}- 드디어 여기가
handler실행의 실제 구현이 떠넘겨진 곳이다. - 먼저
checkRequest()메서드를 수행한다.- 이는
WebContainerGenerator에 구현되어 있다.
- 이는
WebContainerGenerator.checkRequest() 구경하기
protected final void checkRequest(HttpServletRequest request) throws ServletException {
  // Check whether we should support the request method.
  String method = request.getMethod();
  if (this.supportedMethods != null && !this.supportedMethods.contains(method)) {
    throw new HttpRequestMethodNotSupportedException(method, this.supportedMethods);
  }

  // Check whether a session is required.
  if (this.requireSession && request.getSession(false) == null) {
    throw new HttpSessionRequiredException("Pre-existing session required but none found");
  }
}- 1차로 지원하는 메서드인지 검사한다.
- 2차로 세션이 필요한 경로인데, 혹시 세션이 만료된 상태인지 검증한다.
- 둘 중 하나에 해당한다면, 예외 페이지로 보낼 것이다.
- 우리가 접근하려는 페이지는 둘 중 아무것도 해당하지 않는다.
다시 RequestMappingHandlerAdapter.handlerInternal() 로 돌아오기
mav = invokeHandlerMethod(request, response, handlerMethod);- 드디어 모든 선행과정을 거쳐 진짜 핸들러 메서드를 실행해볼 수 있을 것 같다.
invokeHandlerMethod()를 구경해보자.
RequestMappingHandlerAdapter.invokeHandlerMethod() 구경하기
@Nullable
protected ModelAndView invokeHandlerMethod(HttpServletRequest request,
    HttpServletResponse response, HandlerMethod handlerMethod) throws Exception {

  ServletWebRequest webRequest = new ServletWebRequest(request, response);
  try {
    WebDataBinderFactory binderFactory = getDataBinderFactory(handlerMethod);
    ModelFactory modelFactory = getModelFactory(handlerMethod, binderFactory);

    ServletInvocableHandlerMethod invocableMethod = createInvocableHandlerMethod(handlerMethod);
    if (this.argumentResolvers != null) {
      invocableMethod.setHandlerMethodArgumentResolvers(this.argumentResolvers);
    }
    if (this.returnValueHandlers != null) {
      invocableMethod.setHandlerMethodReturnValueHandlers(this.returnValueHandlers);
    }
    invocableMethod.setDataBinderFactory(binderFactory);
    invocableMethod.setParameterNameDiscoverer(this.parameterNameDiscoverer);

    ModelAndViewContainer mavContainer = new ModelAndViewContainer();
    mavContainer.addAllAttributes(RequestContextUtils.getInputFlashMap(request));
    modelFactory.initModel(webRequest, mavContainer, invocableMethod);
    mavContainer.setIgnoreDefaultModelOnRedirect(this.ignoreDefaultModelOnRedirect);

    AsyncWebRequest asyncWebRequest = WebAsyncUtils.createAsyncWebRequest(request, response);
    asyncWebRequest.setTimeout(this.asyncRequestTimeout);

    WebAsyncManager asyncManager = WebAsyncUtils.getAsyncManager(request);
    asyncManager.setTaskExecutor(this.taskExecutor);
    asyncManager.setAsyncWebRequest(asyncWebRequest);
    asyncManager.registerCallableInterceptors(this.callableInterceptors);
    asyncManager.registerDeferredResultInterceptors(this.deferredResultInterceptors);

    if (asyncManager.hasConcurrentResult()) {
      Object result = asyncManager.getConcurrentResult();
      mavContainer = (ModelAndViewContainer) asyncManager.getConcurrentResultContext()[0];
      asyncManager.clearConcurrentResult();
      LogFormatUtils.traceDebug(logger, traceOn -> {
        String formatted = LogFormatUtils.formatValue(result, !traceOn);
        return "Resume with async result [" + formatted + "]";
      });
      invocableMethod = invocableMethod.wrapConcurrentResult(result);
    }

    invocableMethod.invokeAndHandle(webRequest, mavContainer);
    if (asyncManager.isConcurrentHandlingStarted()) {
      return null;
    }

    return getModelAndView(mavContainer, modelFactory, webRequest);
  }
  finally {
    webRequest.requestCompleted();
  }
}- 굉장히 긴 코드지만, 한줄씩 살펴보자.
- 먼저
new ServletWebRequest(request, response)부터 시작한다.
ServletWebRequest 생성자 구경하기
public ServletWebRequest(HttpServletRequest request, @Nullable HttpServletResponse response) {
  super(request, response);
}HttpServletRequest와HttpServletResponse를 받아ServletWebRequest를 생성하려 한다.- 부모 클래스의 생성자를 호출한다.
ServletRequestAttributes 생성자 구경하기
public ServletRequestAttributes(HttpServletRequest request, @Nullable HttpServletResponse response) {
  this(request);
  this.response = response;
}request만을 이용해서ServletRequestAttributes생성자에 넣는다.
public ServletRequestAttributes(HttpServletRequest request) {
  Assert.notNull(request, "Request must not be null");
  this.request = request;
}request가null인지 간단히 확인 후request필드에request를 할당하고 끝난다.
다시 RequestMappingHandlerAdapter.invokeHandlerMethod() 로 돌아오기

- 클라이언트와 경로가 들어있는
ServletWebRequest객체가 생성되었다. - 이후
getDataBinderFactory()메서드를 실행한다.
RequestMappingHandlerAdapter.getDataBinderFactory() 구경하기
private WebDataBinderFactory getDataBinderFactory(HandlerMethod handlerMethod) throws Exception {
  Class<?> handlerType = handlerMethod.getBeanType();
  Set<Method> methods = this.initBinderCache.get(handlerType);
  if (methods == null) {
    methods = MethodIntrospector.selectMethods(handlerType, INIT_BINDER_METHODS);
    this.initBinderCache.put(handlerType, methods);
  }
  List<InvocableHandlerMethod> initBinderMethods = new ArrayList<>();
  // Global methods first
  this.initBinderAdviceCache.forEach((controllerAdviceBean, methodSet) -> {
    if (controllerAdviceBean.isApplicableToBeanType(handlerType)) {
      Object bean = controllerAdviceBean.resolveBean();
      for (Method method : methodSet) {
        initBinderMethods.add(createInitBinderMethod(bean, method));
      }
    }
  });
  for (Method method : methods) {
    Object bean = handlerMethod.getBean();
    initBinderMethods.add(createInitBinderMethod(bean, method));
  }
  return createDataBinderFactory(initBinderMethods);
}@InitBinder나@ControllerAdvice를 통해 만들어진 검증 메서드가 있는지 확인한다.- 검증할 메서드가 있는지 확인할 때는 먼저 캐시부터 뒤져본 뒤에, 없으면 직접 확인한다.
initBinderMethods를 찾아InitBinderDataBinderFactory객체를 만든다.- 다음에 실행될
getModelFactory()를 구경해보자.
RequestMappingHandlerAdapter.getModelFactory() 구경하기
private ModelFactory getModelFactory(HandlerMethod handlerMethod, WebDataBinderFactory binderFactory) {
  SessionAttributesHandler sessionAttrHandler = getSessionAttributesHandler(handlerMethod);
  Class<?> handlerType = handlerMethod.getBeanType();
  Set<Method> methods = this.modelAttributeCache.get(handlerType);
  if (methods == null) {
    methods = MethodIntrospector.selectMethods(handlerType, MODEL_ATTRIBUTE_METHODS);
    this.modelAttributeCache.put(handlerType, methods);
  }
  List<InvocableHandlerMethod> attrMethods = new ArrayList<>();
  // Global methods first
  this.modelAttributeAdviceCache.forEach((controllerAdviceBean, methodSet) -> {
    if (controllerAdviceBean.isApplicableToBeanType(handlerType)) {
      Object bean = controllerAdviceBean.resolveBean();
      for (Method method : methodSet) {
        attrMethods.add(createModelAttributeMethod(binderFactory, bean, method));
      }
    }
  });
  for (Method method : methods) {
    Object bean = handlerMethod.getBean();
    attrMethods.add(createModelAttributeMethod(binderFactory, bean, method));
  }
  return new ModelFactory(attrMethods, binderFactory, sessionAttrHandler);
}@ModelAttribute를 처리하며 유효성 검사도 함께한다.
RequestMappingHandlerAdapter.createInvocableHandlerMethod() 구경하기
protected ServletInvocableHandlerMethod createInvocableHandlerMethod(HandlerMethod handlerMethod) {
  return new ServletInvocableHandlerMethod(handlerMethod);
}ServletInvocableHandlerMethod객체를 생성한다.

이후의 초기화 과정 살펴보기
if (this.argumentResolvers != null) {
  invocableMethod.setHandlerMethodArgumentResolvers(this.argumentResolvers);
}
if (this.returnValueHandlers != null) {
  invocableMethod.setHandlerMethodReturnValueHandlers(this.returnValueHandlers);
}
invocableMethod.setDataBinderFactory(binderFactory);
invocableMethod.setParameterNameDiscoverer(this.parameterNameDiscoverer);

ModelAndViewContainer mavContainer = new ModelAndViewContainer();
mavContainer.addAllAttributes(RequestContextUtils.getInputFlashMap(request));
modelFactory.initModel(webRequest, mavContainer, invocableMethod);
mavContainer.setIgnoreDefaultModelOnRedirect(this.ignoreDefaultModelOnRedirect);MethodArgumentResolver를 세팅한다.MethodReturnValueResolver를 세팅한다.binderFactory를 세팅한다.ParameterNameDiscoverer를 세팅한다.ModelAndViewContainer를 생성한다.- 애트리뷰트를 추가한다.
- 모델을 추가한다.
- 이후
invocableMethod.invokeAndHandle(webRequest, mavContainer);를 실행한다.
ServletInvocableHandlerMethod.invokeAndHandle() 구경하기
public void invokeAndHandle(ServletWebRequest webRequest, ModelAndViewContainer mavContainer,
    Object... providedArgs) throws Exception {

  Object returnValue = invokeForRequest(webRequest, mavContainer, providedArgs);
  setResponseStatus(webRequest);

  if (returnValue == null) {
    if (isRequestNotModified(webRequest) || getResponseStatus() != null || mavContainer.isRequestHandled()) {
      disableContentCachingIfNecessary(webRequest);
      mavContainer.setRequestHandled(true);
      return;
    }
  }
  else if (StringUtils.hasText(getResponseStatusReason())) {
    mavContainer.setRequestHandled(true);
    return;
  }

  mavContainer.setRequestHandled(false);
  Assert.state(this.returnValueHandlers != null, "No return value handlers");
  try {
    this.returnValueHandlers.handleReturnValue(
        returnValue, getReturnValueType(returnValue), mavContainer, webRequest);
  }
  catch (Exception ex) {
    if (logger.isTraceEnabled()) {
      logger.trace(formatErrorForReturnValue(returnValue), ex);
    }
    throw ex;
  }
}- 먼저
returnValue를 계산해주기 위해invokeForRequest()메서드의 구현을 구경하러 가야 한다.
ServletInvocableHandlerMethod.invokeForRequest() 구경하기
@Nullable
public Object invokeForRequest(NativeWebRequest request, @Nullable ModelAndViewContainer mavContainer,
    Object... providedArgs) throws Exception {

  Object[] args = getMethodArgumentValues(request, mavContainer, providedArgs);
  if (logger.isTraceEnabled()) {
    logger.trace("Arguments: " + Arrays.toString(args));
  }
  return doInvoke(args);
}getMethodArgumentValues()를 통해 argument 값들을 얻어온다.
ServletInvocableHandlerMethod.getMethodArgumentValues() 구경하기
protected Object[] getMethodArgumentValues(NativeWebRequest request, @Nullable ModelAndViewContainer mavContainer,
    Object... providedArgs) throws Exception {

  MethodParameter[] parameters = getMethodParameters();
  if (ObjectUtils.isEmpty(parameters)) {
    return EMPTY_ARGS;
  }

  Object[] args = new Object[parameters.length];
  for (int i = 0; i < parameters.length; i++) {
    MethodParameter parameter = parameters[i];
    parameter.initParameterNameDiscovery(this.parameterNameDiscoverer);
    args[i] = findProvidedArgument(parameter, providedArgs);
    if (args[i] != null) {
      continue;
    }
    if (!this.resolvers.supportsParameter(parameter)) {
      throw new IllegalStateException(formatArgumentError(parameter, "No suitable resolver"));
    }
    try {
      args[i] = this.resolvers.resolveArgument(parameter, mavContainer, request, this.dataBinderFactory);
    }
    catch (Exception ex) {
      // Leave stack trace for later, exception may actually be resolved and handled...
      if (logger.isDebugEnabled()) {
        String exMsg = ex.getMessage();
        if (exMsg != null && !exMsg.contains(parameter.getExecutable().toGenericString())) {
          logger.debug(formatArgumentError(parameter, exMsg));
        }
      }
      throw ex;
    }
  }
  return args;
}- 리졸버에서 지원하는 파라미터인지 확인하고, 아니라면 예외를 던진다.
- 이번 경우엔 아무런 파라미터도 없어서 동작하지 않는다.
ServletInvocableHandlerMethod.doInvoke() 살펴보기
@Nullable
protected Object doInvoke(Object... args) throws Exception {
  ReflectionUtils.makeAccessible(getBridgedMethod());
  try {
    return getBridgedMethod().invoke(getBean(), args);
  }
  catch (IllegalArgumentException ex) {
    assertTargetBean(getBridgedMethod(), getBean(), args);
    String text = (ex.getMessage() != null ? ex.getMessage() : "Illegal argument");
    throw new IllegalStateException(formatInvokeError(text, args), ex);
  }
  catch (InvocationTargetException ex) {
    // Unwrap for HandlerExceptionResolvers ...
    Throwable targetException = ex.getTargetException();
    if (targetException instanceof RuntimeException) {
      throw (RuntimeException) targetException;
    }
    else if (targetException instanceof Error) {
      throw (Error) targetException;
    }
    else if (targetException instanceof Exception) {
      throw (Exception) targetException;
    }
    else {
      throw new IllegalStateException(formatInvokeError("Invocation failure", args), targetException);
    }
  }
}- 리플렉션을 통해 브릿지 메서드에 접근이 가능하게 만든다.
- 이번 예제의 브릿지 메서드는
public java.lang.String com.codesoom.assignment.controllers.HelloController.sayHello()이다. - 이후
getBridgedMethod().invoke(getBean(), args);를 통해 호출한다.
Method.invoke()
public Object invoke(Object obj, Object... args)
    throws IllegalAccessException, IllegalArgumentException,
        InvocationTargetException
{
    if (!override) {
        Class<?> caller = Reflection.getCallerClass();
        checkAccess(caller, clazz,
                    Modifier.isStatic(modifiers) ? null : obj.getClass(),
                    modifiers);
    }
    MethodAccessor ma = methodAccessor;             // read volatile
    if (ma == null) {
        ma = acquireMethodAccessor();
    }
    return ma.invoke(obj, args);
}Reflection트릭을 통해 실행한다.
다시 ServletInvocableHandlerMethod.invoke() 로 돌아가기
Object returnValue = invokeForRequest(webRequest, mavContainer, providedArgs);
setResponseStatus(webRequest);- 드디어
returnValue에는"Hello, world!"가 할당되었다. - 이후
setResponseStatus()를 수행한다.
ServletInvocableHandlerMethod.setResponseStatus() 구경하기
private void setResponseStatus(ServletWebRequest webRequest) throws IOException {
  HttpStatus status = getResponseStatus();
  if (status == null) {
    return;
  }

  HttpServletResponse response = webRequest.getResponse();
  if (response != null) {
    String reason = getResponseStatusReason();
    if (StringUtils.hasText(reason)) {
      response.sendError(status.value(), reason);
    }
    else {
      response.setStatus(status.value());
    }
  }

  // To be picked up by RedirectView
  webRequest.getRequest().setAttribute(View.RESPONSE_STATUS_ATTRIBUTE, status);
}- 이는
@ResponseStatus애노테이션을 처리하기 위한 함수이다.
ServletInvocableHandlerMethod.invokeAndHandle() 나머지 내부 동작 구경하기
this.returnValueHandlers.handleReturnValue(
  returnValue, getReturnValueType(returnValue),
mavContainer, webRequest);- 이 전까지의 소스코드는 캐시나 얼리리턴에 관련된 소스코드라서 별로 중요하지 않으니 여기부터 보자.
HandlerMethodReturnValueHandlerComposite.handleReturnValue() 내부 동작 구경하기
@Override
public void handleReturnValue(@Nullable Object returnValue, MethodParameter returnType,
    ModelAndViewContainer mavContainer, NativeWebRequest webRequest) throws Exception {

  HandlerMethodReturnValueHandler handler = selectHandler(returnValue, returnType);
  if (handler == null) {
    throw new IllegalArgumentException("Unknown return value type: " + returnType.getParameterType().getName());
  }
  handler.handleReturnValue(returnValue, returnType, mavContainer, webRequest);
}- 바로
selectHandler()메서드로 넘어간다.
HandlerMethodReturnValueHandlerComposite.selectHandler()
@Nullable
private HandlerMethodReturnValueHandler selectHandler(@Nullable Object value, MethodParameter returnType) {
  boolean isAsyncValue = isAsyncReturnValue(value, returnType);
  for (HandlerMethodReturnValueHandler handler : this.returnValueHandlers) {
    if (isAsyncValue && !(handler instanceof AsyncHandlerMethodReturnValueHandler)) {
      continue;
    }
    if (handler.supportsReturnType(returnType)) {
      return handler;
    }
  }
  return null;
}isAsyncValue는 스프링 Web MVC 와 상관없으니 넘어가자.- Reactive 와 상관있다.
this.returnValueHandlers에는 무려 15개의returnValueHandler가 담겨있다.

- 우리가 작성한 핸들러 메서드는
RequestResponseBodyMethodProcessor에 의해 처리될 것이 분명하다.
@Override
public boolean supportsReturnType(MethodParameter returnType) {
  return (AnnotatedElementUtils.hasAnnotation(returnType.getContainingClass(), ResponseBody.class) ||
      returnType.hasMethodAnnotation(ResponseBody.class));
}ResponseBody.class애노테이션이 있으면true를 반환하도록 되어있다.selectHandler()메서드가 끝난다.handleReturnValue()메서드가 수행된다.
@Override
public void handleReturnValue(@Nullable Object returnValue, MethodParameter returnType,
    ModelAndViewContainer mavContainer, NativeWebRequest webRequest)
    throws IOException, HttpMediaTypeNotAcceptableException, HttpMessageNotWritableException {

  mavContainer.setRequestHandled(true);
  ServletServerHttpRequest inputMessage = createInputMessage(webRequest);
  ServletServerHttpResponse outputMessage = createOutputMessage(webRequest);

  // Try even with null return value. ResponseBodyAdvice could get involved.
  writeWithMessageConverters(returnValue, returnType, inputMessage, outputMessage);
}- 여기서
setRequestHandled(true)를 수행 후에inputMessage와outputMessage를 생성 후에 종료된다. - 이후
getModelAndView()를 반환하게 된다.
@Nullable
private ModelAndView getModelAndView(ModelAndViewContainer mavContainer,
    ModelFactory modelFactory, NativeWebRequest webRequest) throws Exception {

  modelFactory.updateModel(webRequest, mavContainer);
  if (mavContainer.isRequestHandled()) {
    return null;
  }
  ModelMap model = mavContainer.getModel();
  ModelAndView mav = new ModelAndView(mavContainer.getViewName(), model, mavContainer.getStatus());
  if (!mavContainer.isViewReference()) {
    mav.setView((View) mavContainer.getView());
  }
  if (model instanceof RedirectAttributes) {
    Map<String, ?> flashAttributes = ((RedirectAttributes) model).getFlashAttributes();
    HttpServletRequest request = webRequest.getNativeRequest(HttpServletRequest.class);
    if (request != null) {
      RequestContextUtils.getOutputFlashMap(request).putAll(flashAttributes);
    }
  }
  return mav;
}- 여기서
ModelAndView를 세팅한다. - 단,
@ResponseBody는RequestResponseBodyMethodProcessor에 의해 처리되었으므로ModelAndView로null을 반환한다. - 드디어
RequestMappingHandlerAdapter.handleInternal()가 끝난다.
다시 또 DispatchServlet.doDispatch() 로 돌아오기
mappedHandler.applyPostHandle(processedRequest, response, mv);- 여기서는 해당 핸들러 메서드를 처리하기 전 인터셉터를 한번 더 처리한다.
마지막으로 DispatchSErvlet.processDispatchResult() 구경하기
private void processDispatchResult(HttpServletRequest request, HttpServletResponse response,
    @Nullable HandlerExecutionChain mappedHandler, @Nullable ModelAndView mv,
    @Nullable Exception exception) throws Exception {

  boolean errorView = false;

  if (exception != null) {
    if (exception instanceof ModelAndViewDefiningException) {
      logger.debug("ModelAndViewDefiningException encountered", exception);
      mv = ((ModelAndViewDefiningException) exception).getModelAndView();
    }
    else {
      Object handler = (mappedHandler != null ? mappedHandler.getHandler() : null);
      mv = processHandlerException(request, response, handler, exception);
      errorView = (mv != null);
    }
  }

  // Did the handler return a view to render?
  if (mv != null && !mv.wasCleared()) {
    render(mv, request, response);
    if (errorView) {
      WebUtils.clearErrorRequestAttributes(request);
    }
  }
  else {
    if (logger.isTraceEnabled()) {
      logger.trace("No view rendering, null ModelAndView returned.");
    }
  }

  if (WebAsyncUtils.getAsyncManager(request).isConcurrentHandlingStarted()) {
    // Concurrent handling started during a forward
    return;
  }

  if (mappedHandler != null) {
    // Exception (if any) is already handled..
    mappedHandler.triggerAfterCompletion(request, response, null);
  }
}
if (exception != null) {}에서는 예외가 있다면 처리한다.if (mv != null && !mv.wasCleared()) {}에서는 뷰가 있다면 렌더링한다.- 이후 아래의 코드를 수행한다.
if (mappedHandler != null) {
  // Exception (if any) is already handled..
  mappedHandler.triggerAfterCompletion(request, response, null);
}
void triggerAfterCompletion(HttpServletRequest request, HttpServletResponse response, @Nullable Exception ex)
throws Exception {
HandlerInterceptor[] interceptors = getInterceptors();
if (!ObjectUtils.isEmpty(interceptors)) {
for (int i = this.interceptorIndex; i >= 0; i--) {
HandlerInterceptor interceptor = interceptors[i];
try {
interceptor.afterCompletion(request, response, this.handler, ex);
}
catch (Throwable ex2) {
logger.error("HandlerInterceptor.afterCompletion threw exception", ex2);
}
}
}
}- 인터셉터에
afterCompletion콜백에 작성된 코드를 수행하는 부분이다. - 이후
doDispatch()가 끝나고doService()가 실행된다. - 이후
doGet() - 마지막에는
SocketProcessorBase.java의run()까지 가게 된다.
'프레임워크 > 스프링 프레임워크' 카테고리의 다른 글
| RedirectAttributes 란? (feat. addFlashAttribute 에 대한 설명 포함) (0) | 2023.04.17 |
|---|---|
| 스프링 프레임워크 버전 4.2에서 4.3 업그레이드시 변화사항 (0) | 2023.03.23 |
| 스프링 객체 검증 (Validation) 적용하기 (0) | 2022.05.29 |
| asciidoctor 를 통한 Spring REST Docs 자동 생성 세팅하기 (2) | 2022.05.18 |
| Spring REST Docs + asciidoctor 로 문서 자동 생성해보기 (0) | 2022.05.15 |